Sony A7R IV | 135 GM | ISO 1250 | f/1.8 | 1/500 secSony A7R IV | 100-400 GM | 190mm | ISO 100 | f/11 | 1/2 secSony A7R IV | 100-400 GM | 400mm | ISO 12800 | f/5.6 | 1/640 secSony A7R IV | 100-400 GM | 400mm | ISO 12800 | f/5.6 | 1/640 secSony A7R IV | 100-400 GM | 400mm | ISO 10000 | f/5.6 | 1/500 secSony A7R IV | 100-400 GM | 400mm | ISO 10000 | f/5.6 | 1/500 secSony A7R IV | 100-400 GM | 100mm | ISO 10000 | f/4.5 | 1/500 secSony A7R IV | 100-400 GM | 400mm | ISO 10000 | f/5.6 | 1/500 sec
It has been a while since I’ve gone out to take photos on the weekend, and I’ve been thinking about it for a little while. I finally bit the bullet and scheduled my visit to Brazos Bend State Park. Although this park doesn’t have the sexiest landscapes for photography, the park does have real trails and a lot of them. Some of my favorites are by the lakes where you can see a lot of wildlife.
Weather
We had some rain come through on Friday and we had scattered storms forecast for Saturday morning. As I was heading it out, it had started to rain, but I brought a rain jacket, and was ready to weather the weather.
Fortunately, by the time I arrived at the park, there was no rain, I only had to deal with some light sprinkles.
Trail
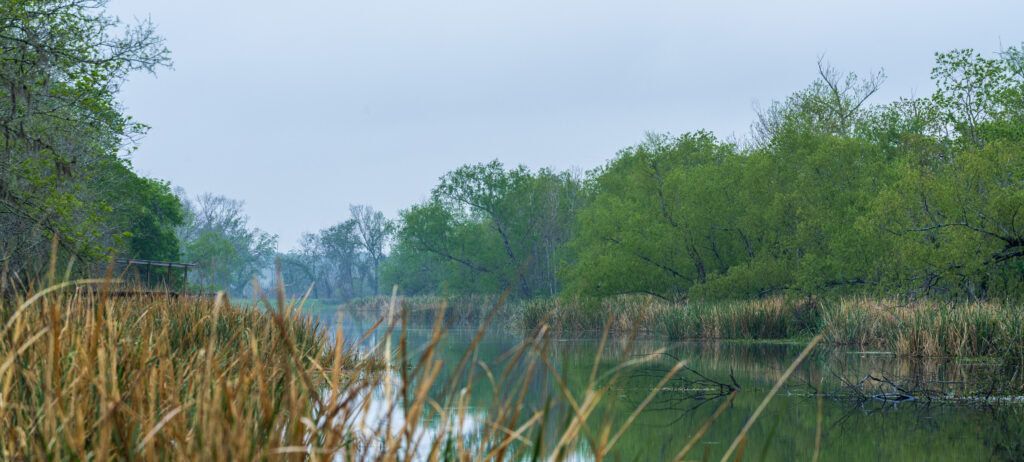
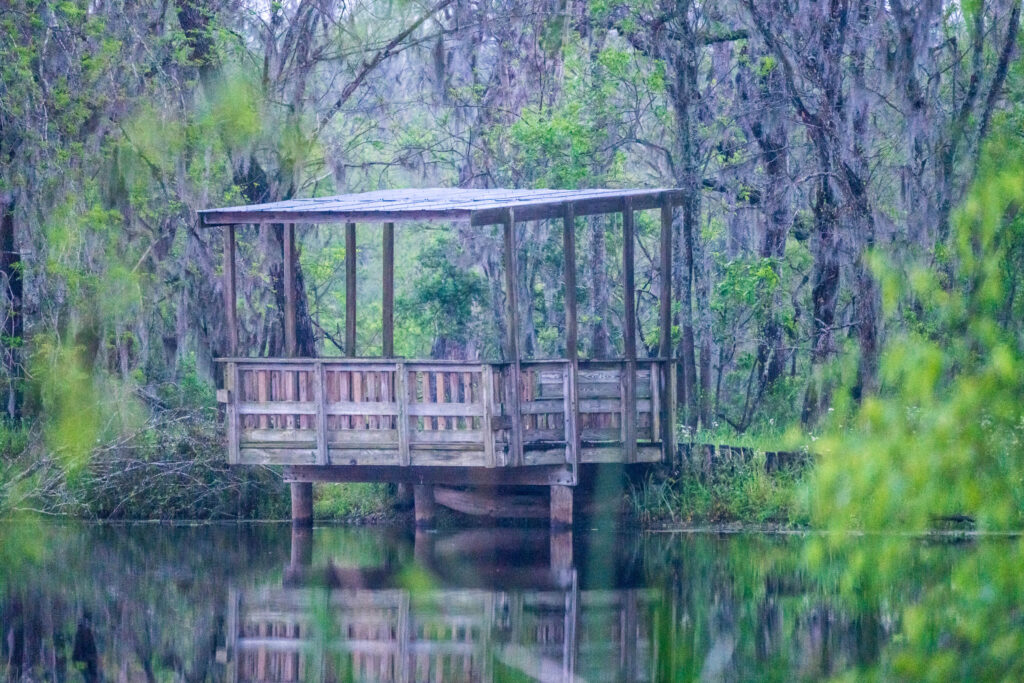
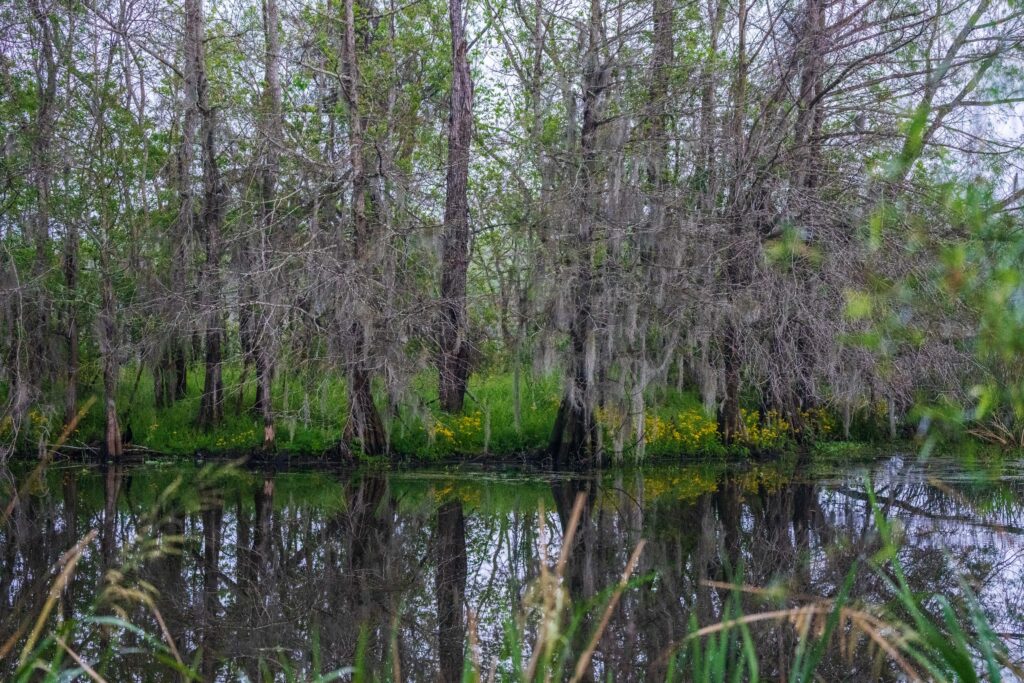
Since this was the first time I’ve been out in a while, I wanted to stick with a tried and true trail to get started. I went with the Elm Lake Loop Trail. It was 2 miles around Elm Lake, not the most scenic lake, but it is home to a lot of wildlife. There were puddles in a few places, and I did get some mud on my boots, but fortunately, I have waterproof boots, so it was no worry. It was very humid.
Wildlife
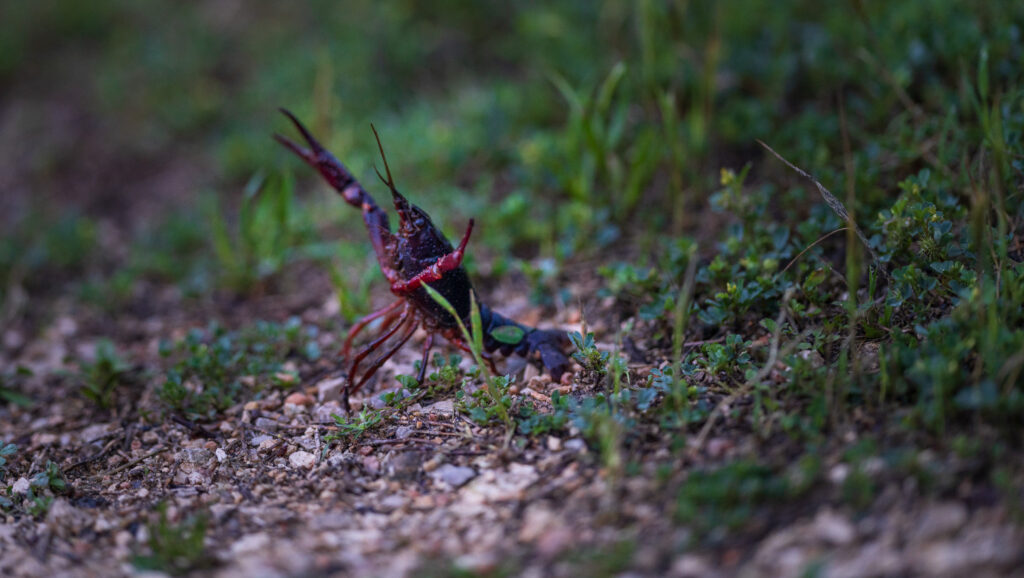
I parked on the far side of the lake (west) and took it clockwise. The hike started off slow with minimal wildlife. I did see deer tracks, but I didn’t see any deer. The ground was quite damp which made the deer tracks more apparent. As I was hiking I saw something small moving, and as I approached, I could see that it was a crawfish. I was able to get off a couple of shots before he spotted me and went full defense. Interestingly, as I moved positions, it did not change, so that’s how I was able to get this side view. That was shot on my 135mm F/1.8, it was still fairly dark out, so I had to crank up on the ISO.
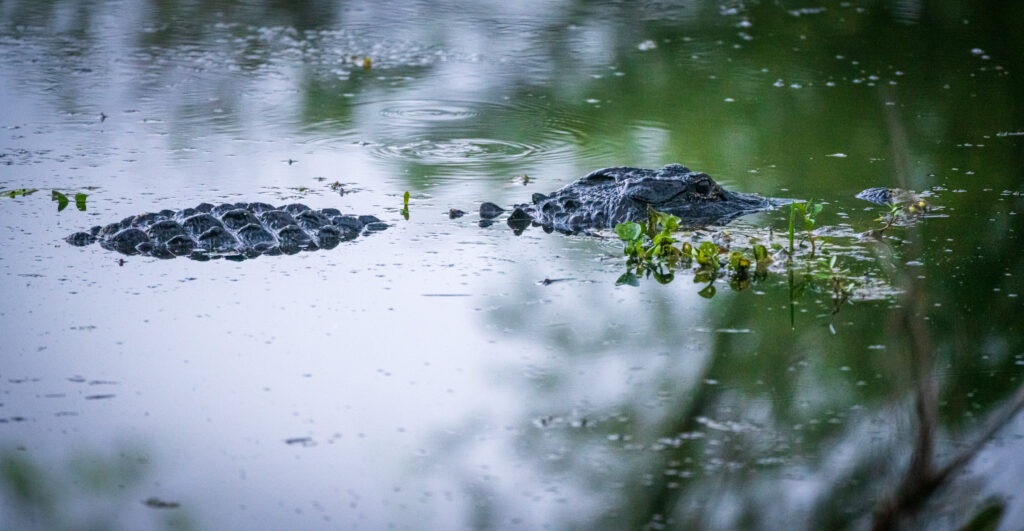
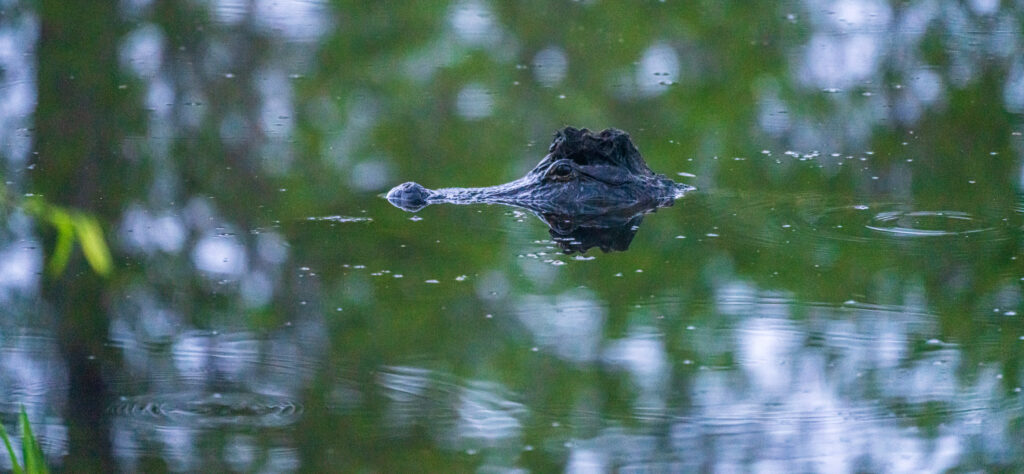
As I continued down the trail, I could really hear the frogs going, there were several birds, but I didn’t see any gators yet. When I got to the southwest corner of the lake, that’s where the gators were. I put on my CP and switched to my 100-400mm. We’ll see, but if I keep making visits, that new Sigma 300-600 F4 might become necessary.
One of the gators had some stuff on its head, I found this amusing because it was like it was wearing a hat.
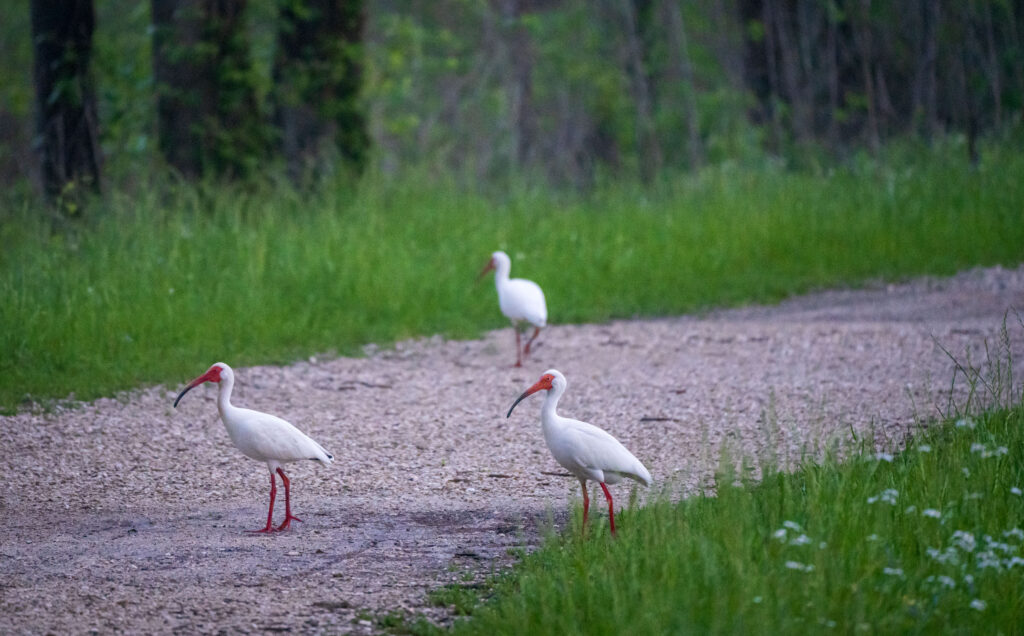
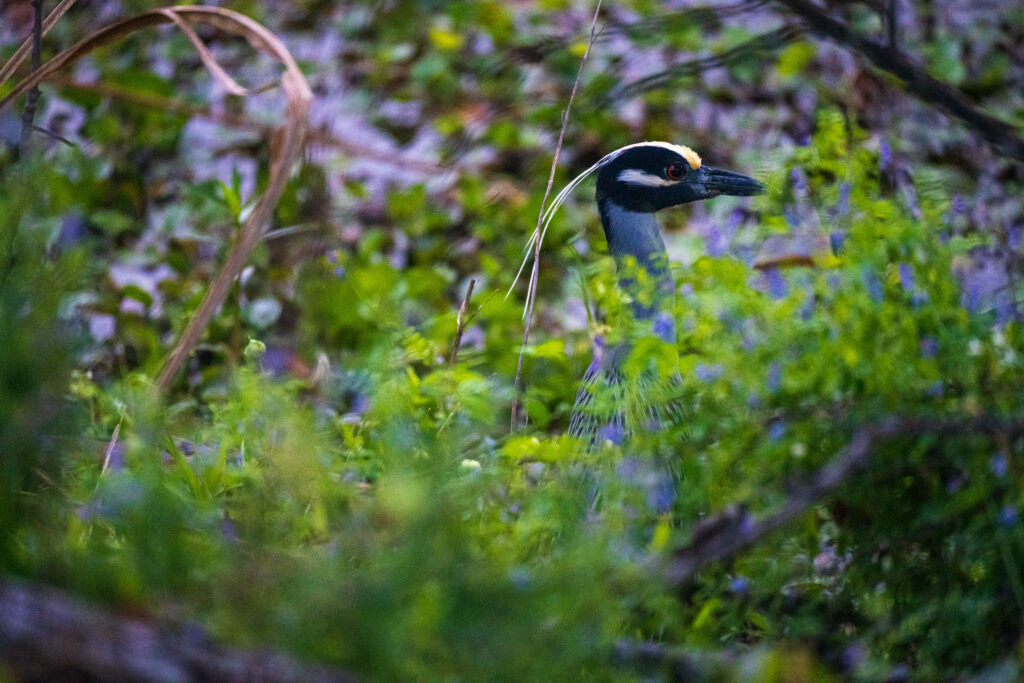
I didn’t see any more gators after this, so I started focusing on the birds. I had a cardinal, egrets, ibis, and heron.
I was trying out a new bag, a messenger style, and after about an hour, it was starting to wear on me. I still need to figure out a better way to carry my gear whilst hiking. My backpack is nice, but it isn’t easy to make adjustments on the fly.
I did bring my tripod with me, which didn’t help with the weight, and I ended up not using it. Given the conditions, I didn’t really want to sit down on the ground, and elevating the tripod to standing height wouldn’t have made for interesting photos.
Sony A7R IV | 100-400 GM + 2x Tele | 800mm | ISO 5000 | f/11 | 1/125 secSony A7R IV | 100-400 GM + 2x Tele | 800mm | ISO 6400 | f/11 | 1/30 secSony A7R IV | 100-400 GM + 2x Tele | 800mm | ISO 25600 | f/11 | 1/10 sec
Lunar Eclipse
This was not an easy night of shooting for me. I’m not often up too late, but I wanted to stay up to see the eclipse. As I learned with my trip to West Texas, don’t wait to do it later, it might not happen.
Around 10:00 PM, the skies were clear, and everything looked great, however, when I went to shoot, I got to my spot, atop a parking garage, and it was cloudy as far as I could see. Completely socked in. I checked my app, https://clearoutside.com/, and found that high cloud cover was low, and mid was around 84%. I waited a minute to see if I’d get a chance to view the moon. There was good news and bad news. The good news was that the clouds were moving quickly. That was also the bad news, when breaks in the clouds came, they were short lived.
As defeated as I felt, I was in the mindset of I’m still up, I’m here, I’m equipped, lets wait it out and see what happens.
I setup the tripod, my camera, the 100-400 with the 2x teleconverter, and my remote release for the shutter.
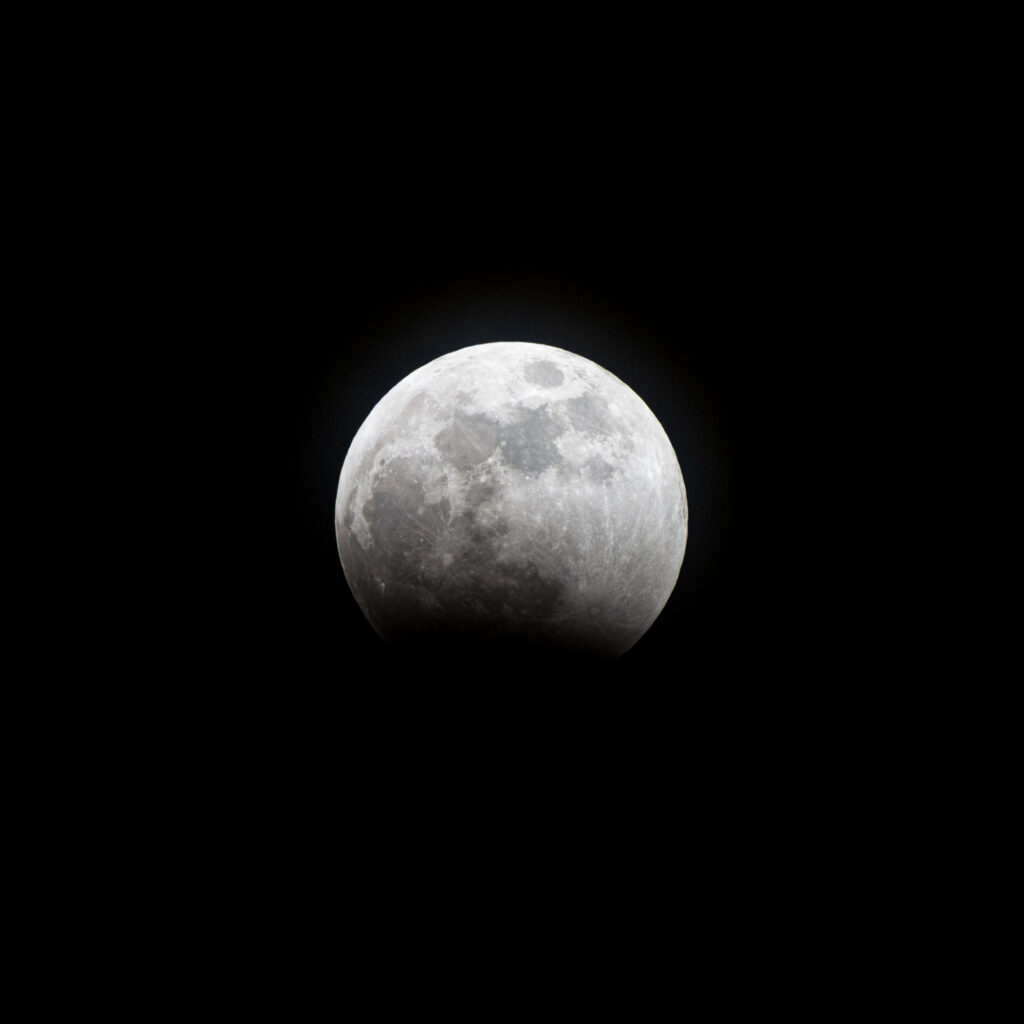
I tracked the moon, and framed up the shot. With the full moon, getting pin sharp shots was easy. As I learned quickly, the moon is moving quickly, so even shutterspeeds of a second would result in blurry shots.
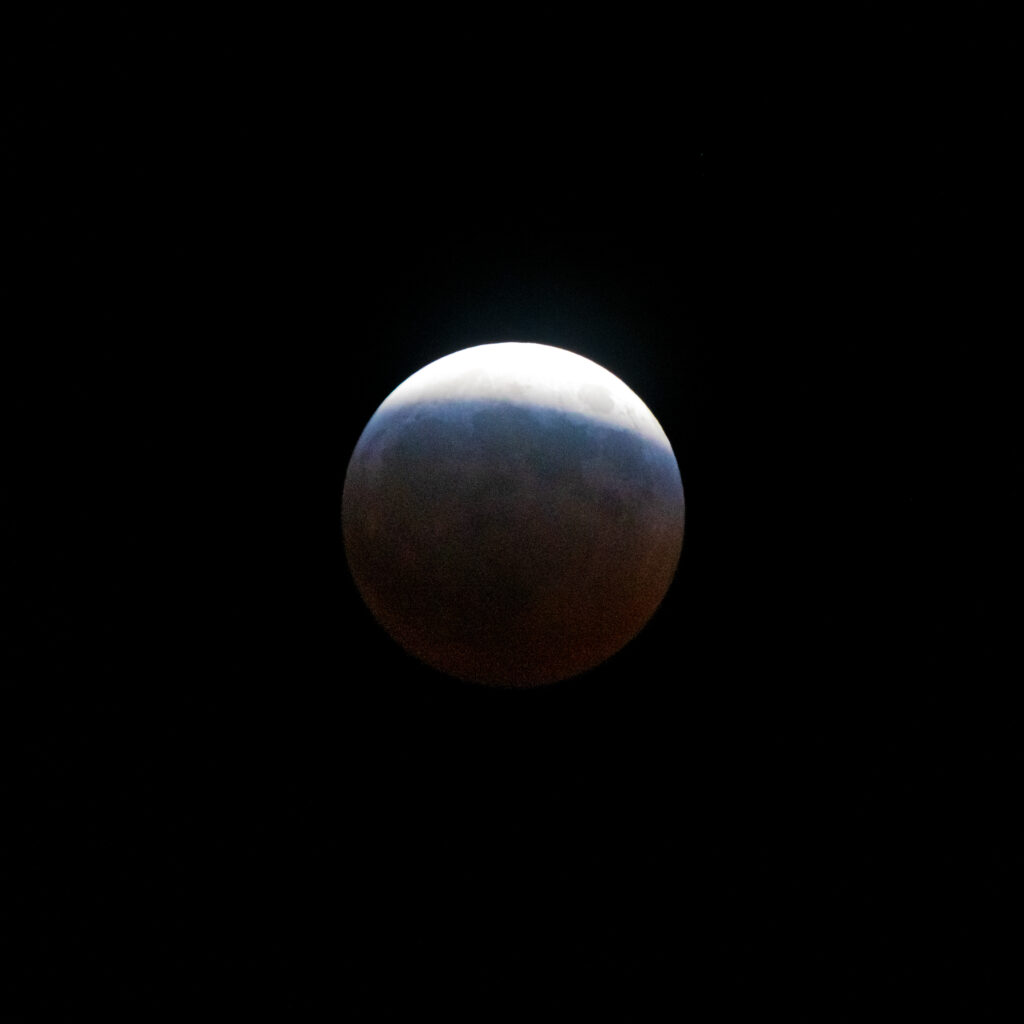
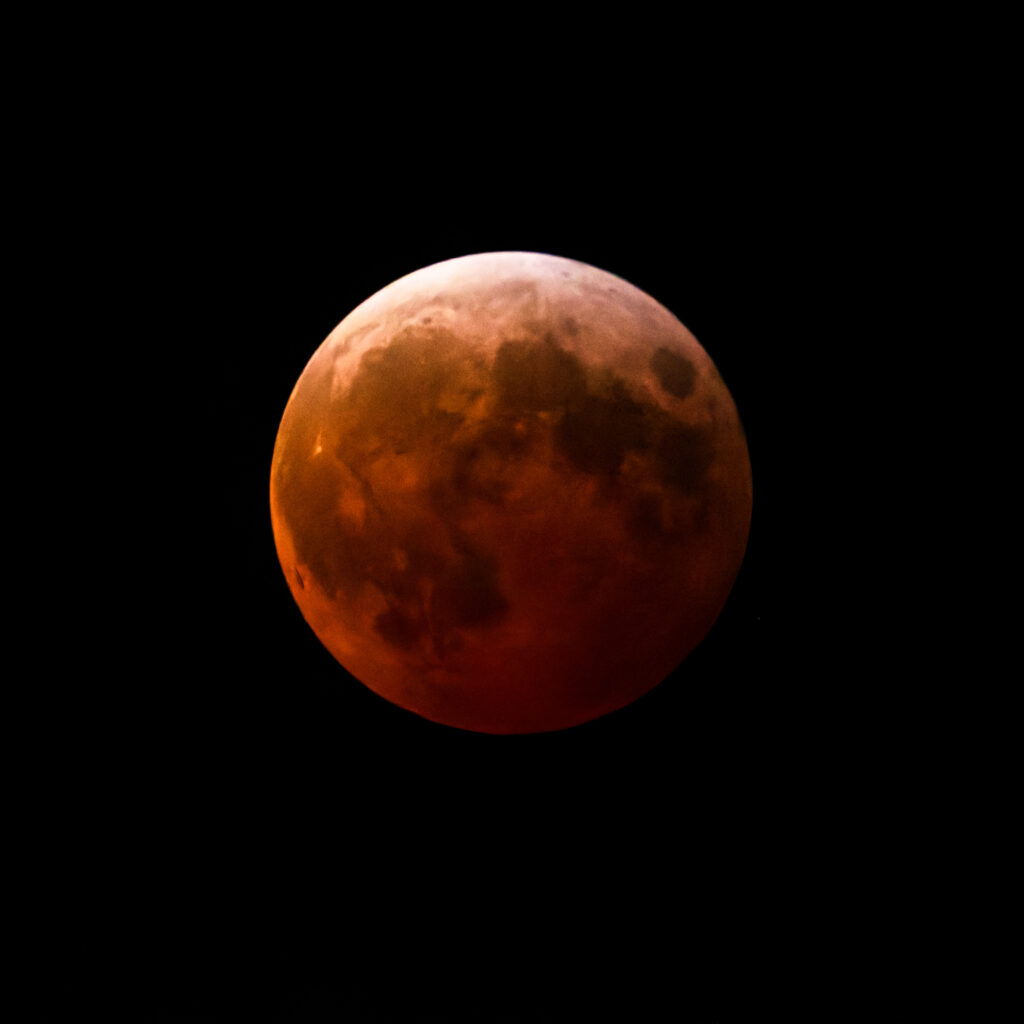
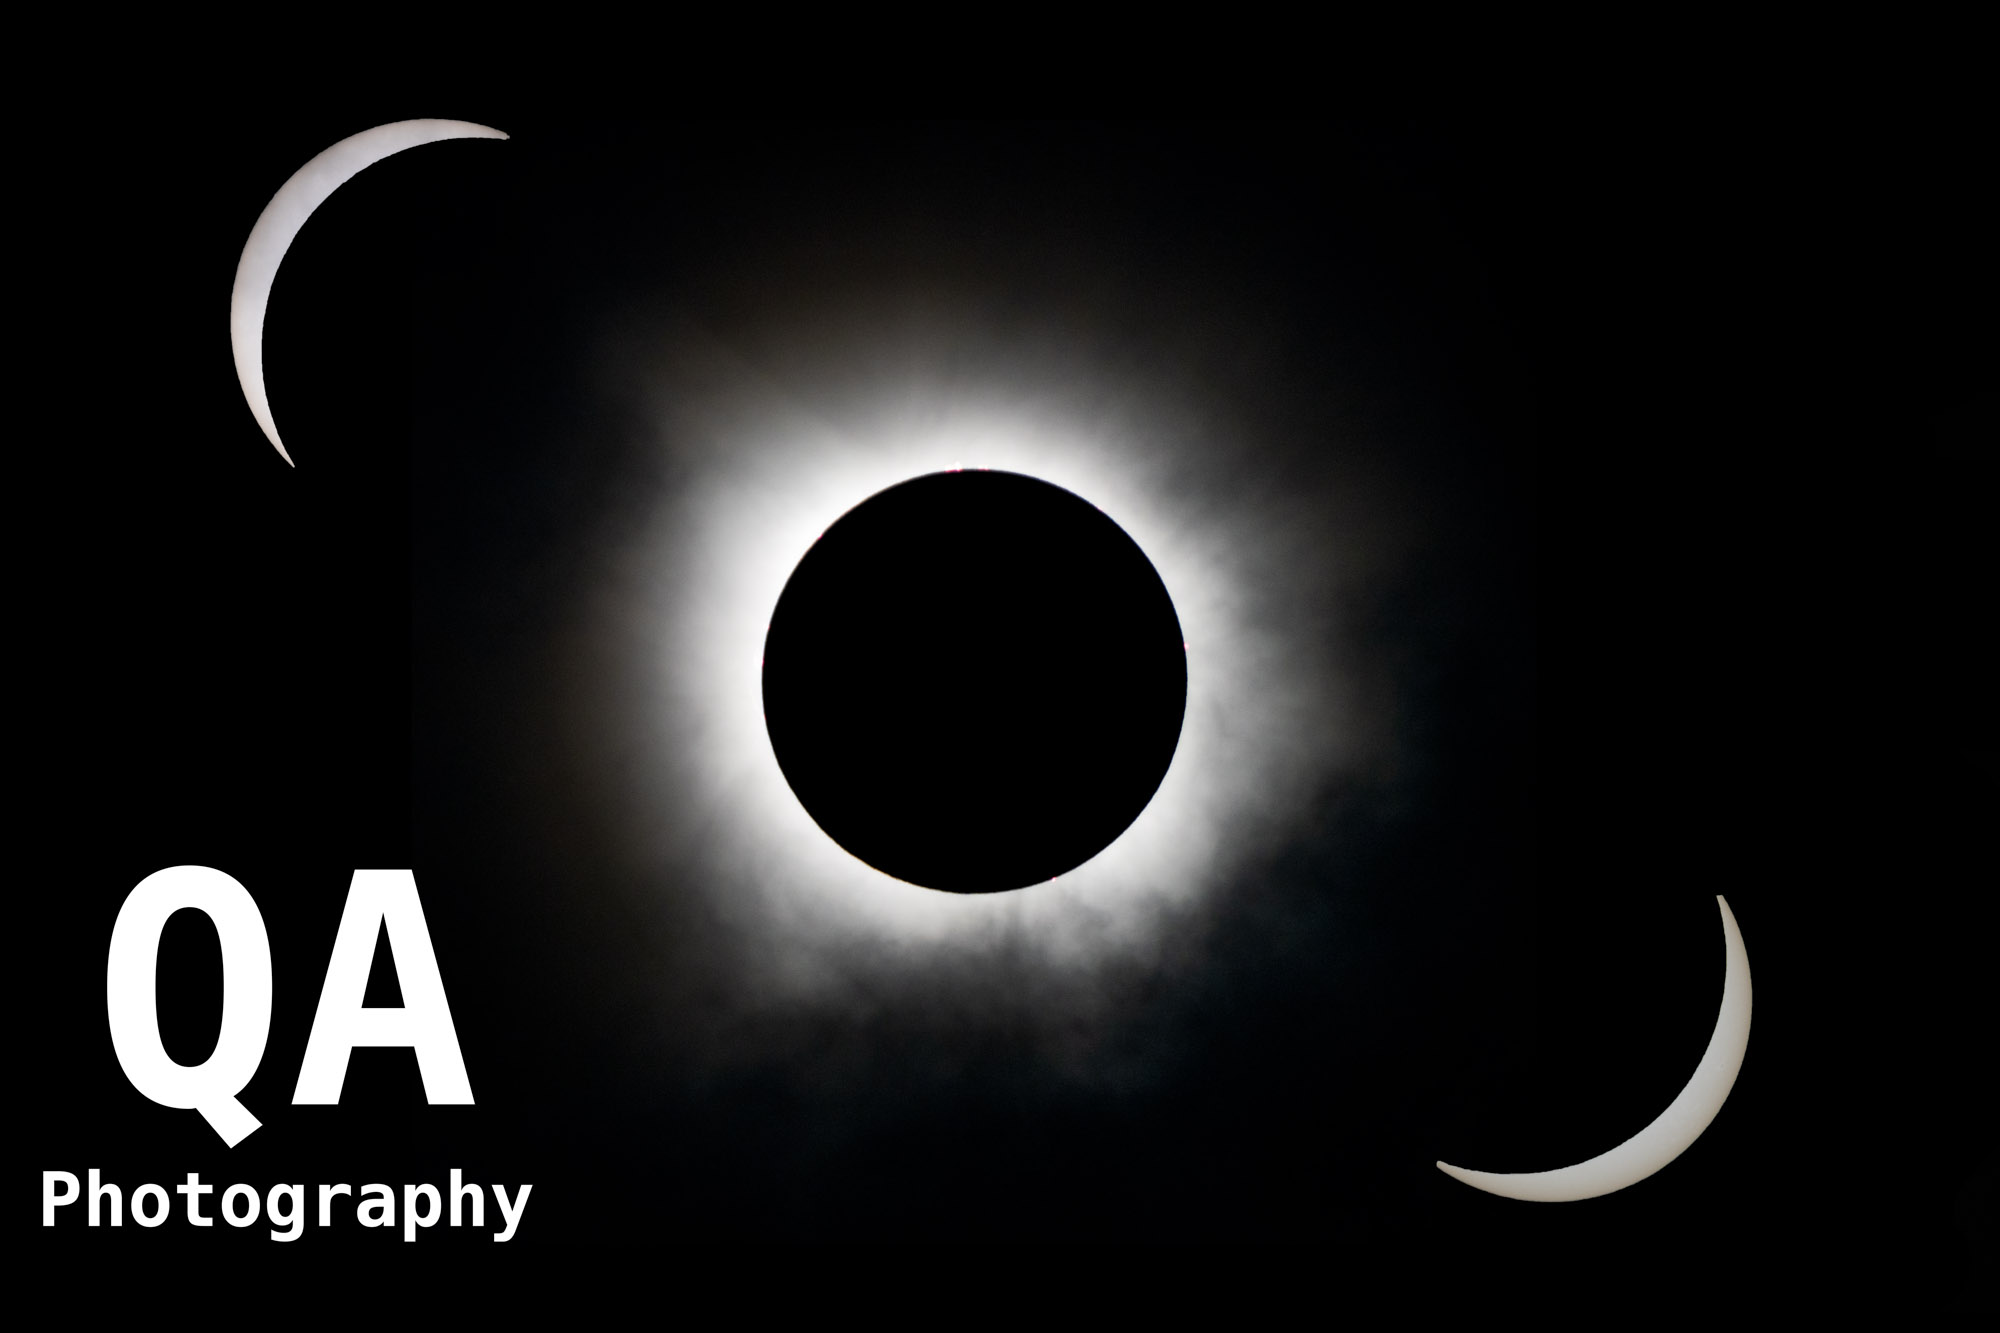
Shortly after I setup, I started seeing the shadow creep on to the moon. I had to adjust my tripod often to keep the moon in frame. I did turn on bracketing just to be extra safe. As the eclipse progressed, I dropped my shutter from 1/500-1/125, then started cranking up the ISO. By the time the total eclipse was happening, I was up to ISO 25600. Even then, the primary shot was still a bit dark, and I ended up using bracketed photos as my keepers. I do think next time, I would not do bracketing, and just enable burst shooting. It was a little windy out, but for whatever reason, I found often my first frame was blurry, but the subsequent shots were much sharper. The orange color was visible, but not quite as brilliant as the photo.
I did call it quits around 3:00 AM, because I did have work in a few hours. It’s times like this I wish the Sony supported pixel binning.
Sony A7R IV | 16-35 GM II | 16mm | ISO 100 | f/4 | 10 secSony A7R IV | 16-35 GM II | 27mm | ISO 100 | f/11 | 1/2 secSony A7R IV | 100-400 GM | 135mm | ISO 200 | f/5.0 | 1/500 secSony A7R IV | 100-400 GM | 400mm | ISO 100 | f/5.6 | 1/400 secSony A7R IV | 16-35 GM II | 16mm | ISO 3200 | f/2.8 | 8 secSony A7R IV | 24-70 GM II | 70mm | ISO 100 | f/11 | 1/10 secSony A7R IV | 24-70 GM II | 35mm | ISO 100 | f/2.8 | 1/500 secSony A7R IV | 24-70 GM II | 70mm | ISO 100 | f/11 | 1/30 secSony A7R IV | 24-70 GM II | 24mm | ISO 100 | f/2.8 | 1/500 secSony A7R IV | 24-70 GM II | 34mm | ISO 100 | f/5.6 | 1/100 secSony A7R IV | 100-400 GM | 100mm | ISO 100 | f/4.5 | 1/400 secSony A7R IV | 100-400 GM | 100mm | ISO 100 | f/4.5 | 1/320 secSony A7R IV | 24-70 GM II | 57mm | ISO 100 | f/11 | 1/125 secSony A7R IV | 100-400 GM | 162mm | ISO 100 | f/11 | 1/125 secSony A7R IV | 24-70 GM II | 24mm | ISO 100 | f/2.8 | 1/800 secSony A7R IV | 24-70 GM II | 26mm | ISO 100 | f/2.8 | 1/200 secSony A7R IV | 100-400 GM | 100mm | ISO 400 | f/4.5 | 1/400 secSony A7R IV | 100-400 GM | 100mm | ISO 400 | f/4.5 | 1/320 secSony A7R IV | 100-400 GM | 179mm | ISO 100 | f/11 | 1/3 secSony A7R IV | 100-400 GM | 121mm | ISO 100 | f/11 | 8 secSony A7R IV | 100-400 GM | 100mm | ISO 100 | f/11 | 1/3 sec
West Texas
I was invited to join some friends in West Texas for New Year’s Eve. After a quick look at the map, I was all in. There were two National Parks within driving distance that sold me, but after research there were many other sights that would be worth while as well.
We flew from Houston to El Paso to avoid the 9+ hour drive. I would have preferred the road trip, but we were just flying back from family for Christmas, and we were tight on time.
We drove from El Paso to Alpine. Marfa is well known, but Alpine is the biggest town in the area. It has a population around 6,000. Ft. Davis & Marfa are only about a third of the size. I mention that because it definitely has the most in terms of food and accommodations.
Despite flying out, this still felt like a road trip because we spent many hours in the car getting around to all of our destinations. As you’ll see on the map, Alpine is fairly central with highways running south to Big Bend, West to Marfa and Van Horn, North to Ft. Davis, and East to Marathon.
Our first night in, We visited the MacDonald Observatory. They will hold star parties, where you learn about the night sky and have the opportunity to look through their “small” telescopes. They refer to them as small, but they’re very large. Just not the very large ones. It was a little cloudy on the night we went, but they still did a lot of education and I was happy we went. Highly recommend it.
Guadalupe Mountains National Park
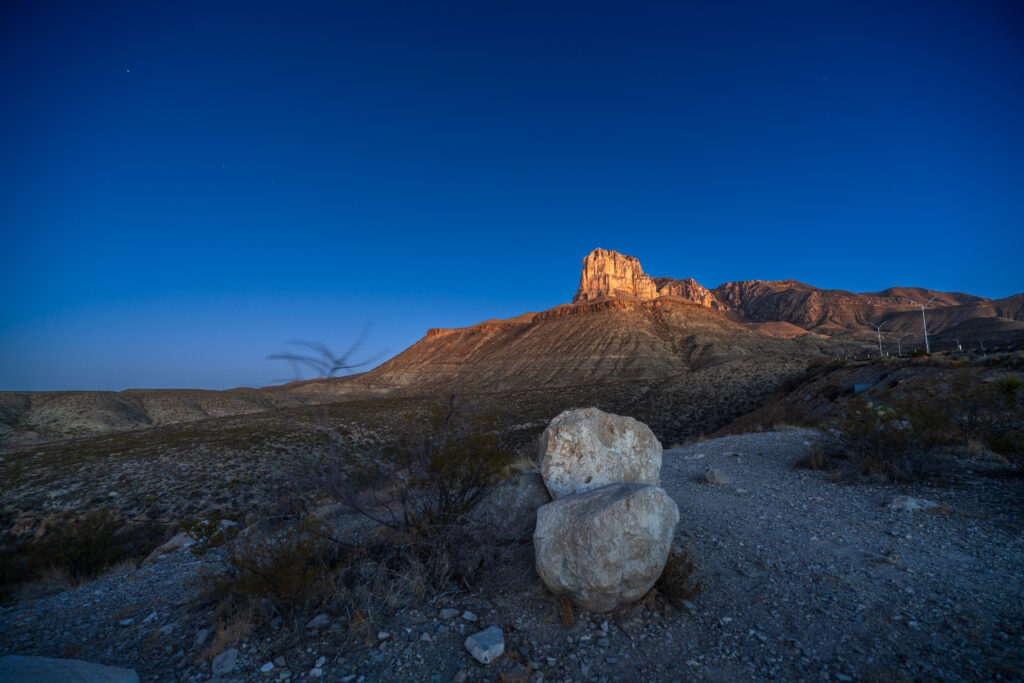
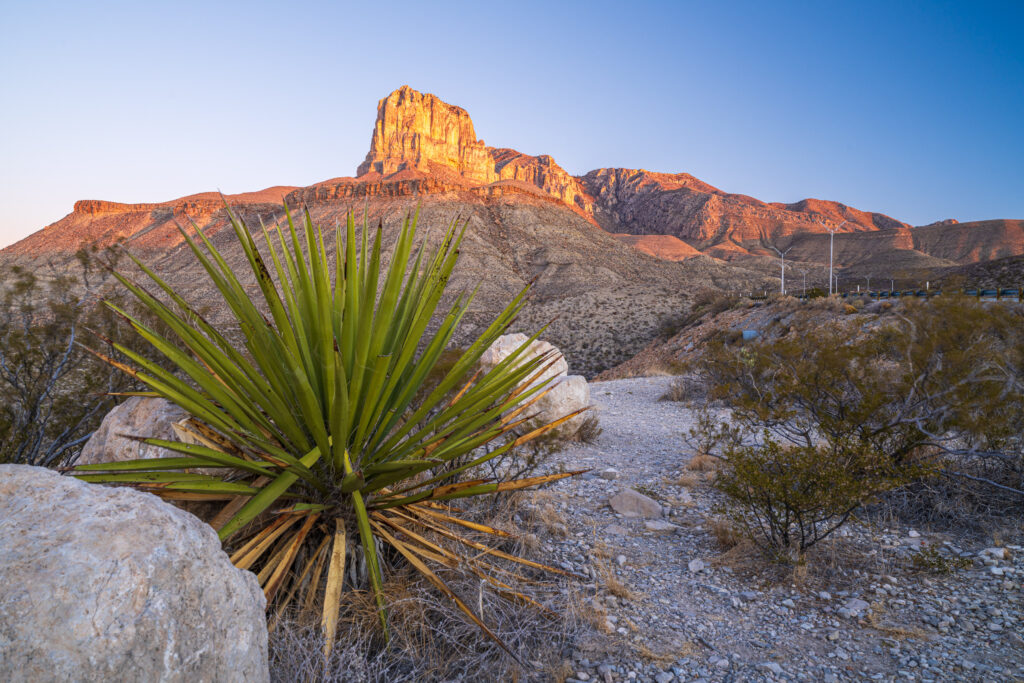
The first day, I was going to make a solo trip to the Guadalupe Mountains National Park. I really wanted to photograph El Capitan as the sun rose, which meant leaving at 4:00 in the morning. I ended up leaving a little early, and I’m glad I did. Even though you are able to drive fast enough to make up time, when it is still dark out you can’t see anything. Even with the high beams on, there’s nothing there to reflect the light, and of course the whole time you’re watching for wildlife trying to avoid an accident.
Upon making it to the park, I stopped at the El Capitan turn off to photograph the sunrise. It was very windy that morning. I’m glad I brought my real tripod. When I first got there, it was still dark enough to photograph the mountain with stars in the sky, but as you can see in the image, the mountain is already starting to reflect some light from the sun.
After sunrise, I visited the park to hike some trails. This is when I learned that although Central Time zone applies to most of the surrounding area, the national park is actually in Mountain. The rangers were very helpful and recommended that I do the McKittrick Canyon trail. It was a great hike, great scenery.
Do know, there’s not much in terms of infrastructure, so be sure to bring a lot of water and food, you’re minimum an hours drive to purchase some. I was prepared with water, but not food, so early afternoon, returned from the trails and headed back.
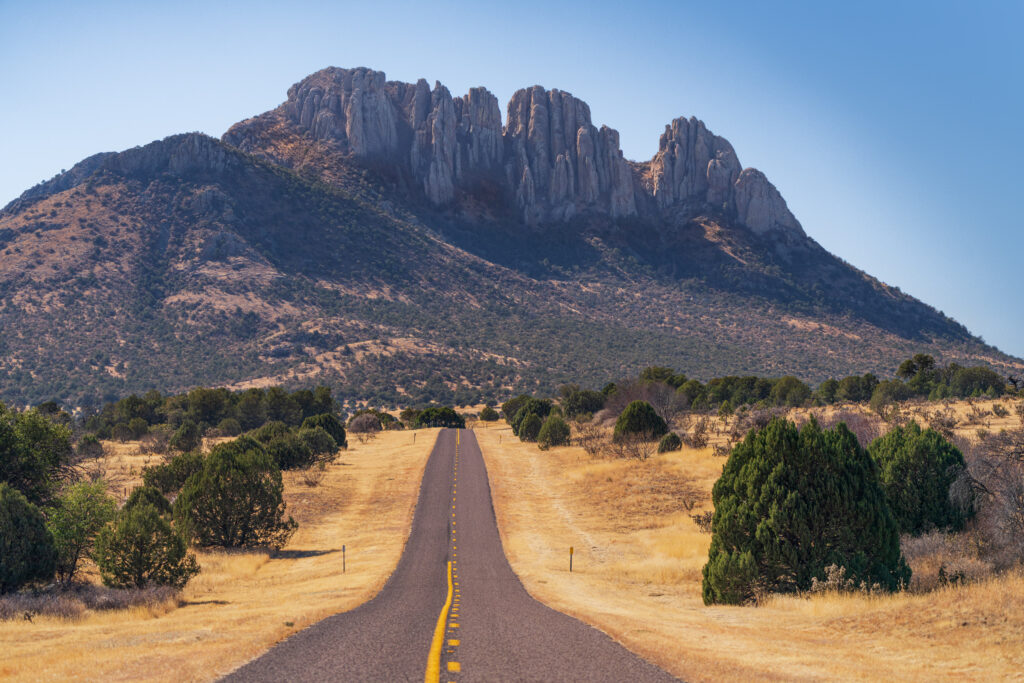
Davis Mountains
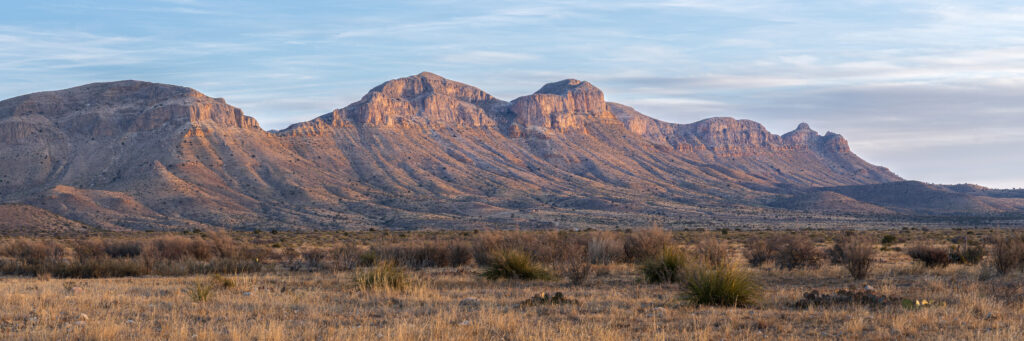
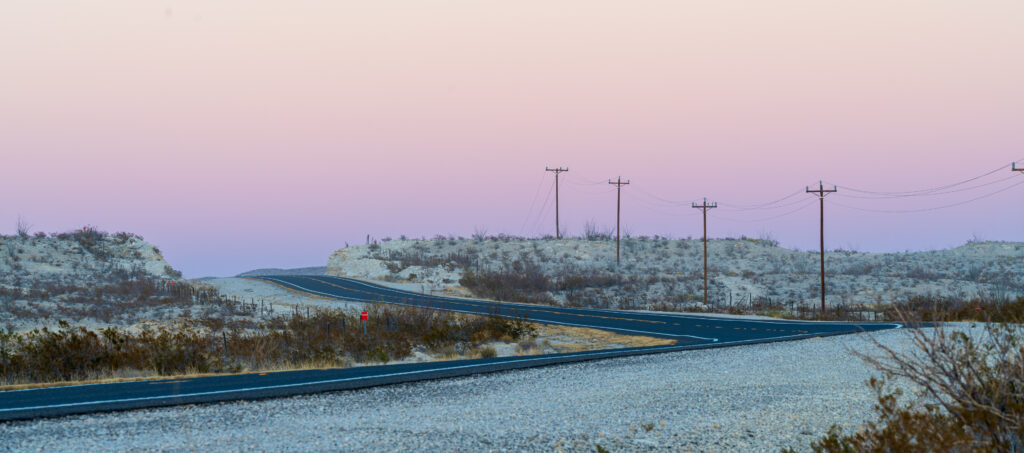
From Van Horn, I decided to take the scenic route home. There is a senic loop through the Davis Mountains just west of Fort Davis. I took I-10 East, and exited at Kent. The landscape here is beautiful, even well before reaching the loop. The hills, mountains, semi-desert landscape was stunning. The lack of traffic allows for you to spend hours on the road and not feel tired, too.
When I reached the loop, I took Texas highway 166 which goes west and south of the mountains. The rocky Davis Mountains make a for a beautiful backdrop on the windy road around them. I found myself pulling over constantly to take pictures. I was there just after winter had started, I do think the best photographic opportunities would be during summer with the sun to the north.
The loop drive ended in Ft. Davis, and from there it was a quick drive back to Alpine.
Alpine & Marfa
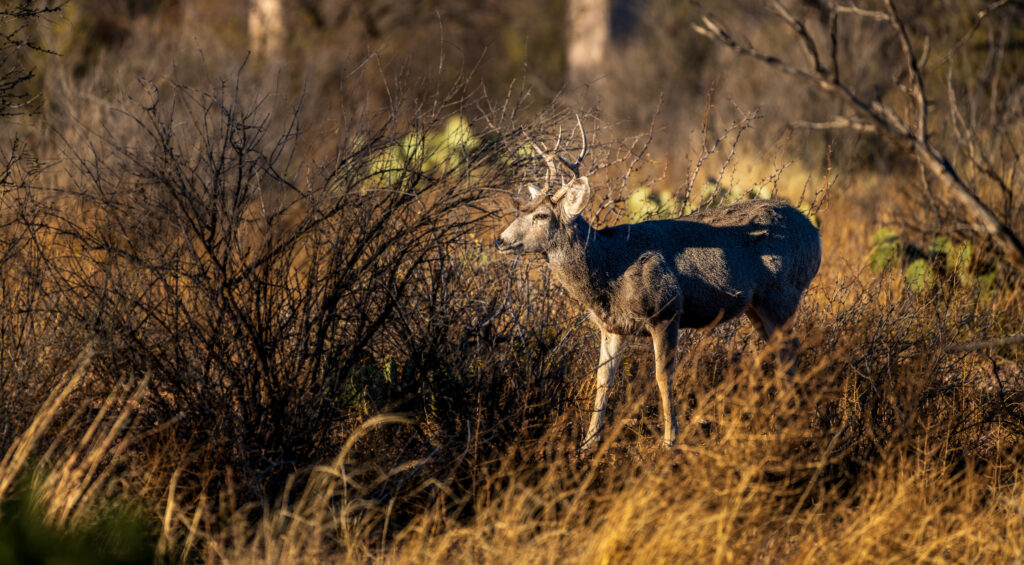
Alpine, despite being the largest, is still a quite small town. Between the towns are mountains that make the drive between them rewarding. In Alpine, once you get off the main road, and there’s only one, you must keep an eye out for wildlife. Door was the most common, but we did see a large wild cat, once. The deer photo was taken from the front porch of our place. We did not feed them or interfere with them, just admired from afar.
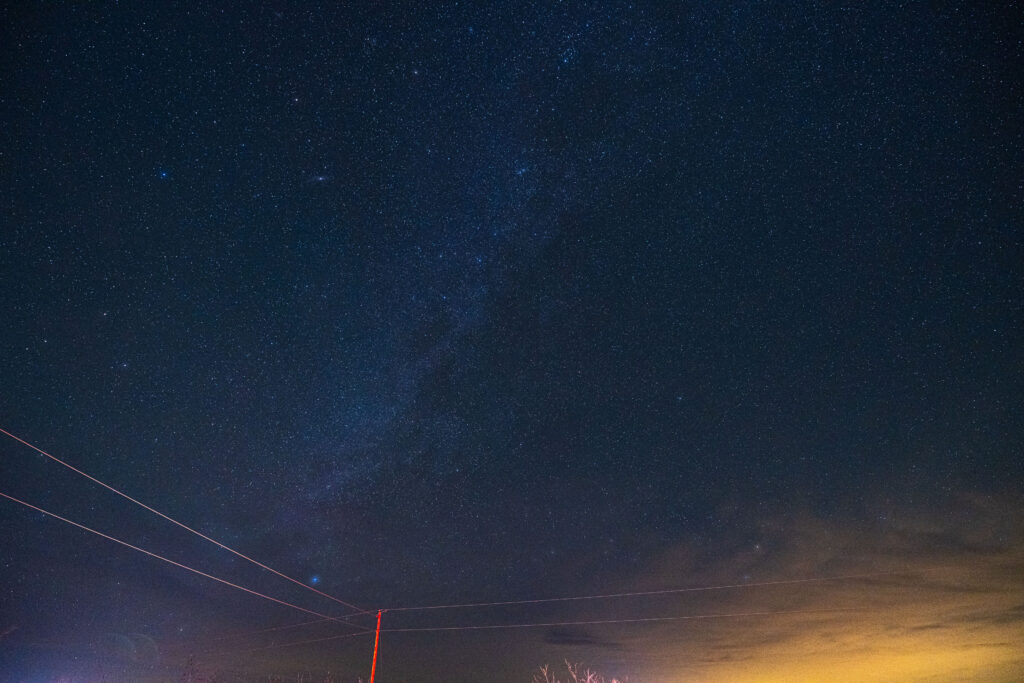
In preparing for the trip, I had read about Marfa Lights. You can learn more about them here, but the TLDR, back in the 19th century, a guy was traveling through the area and at night noticed several lights off in the distance. The next day teams went out to find sources of camp fires or Native American activity and found nothing. I did see the Marfa Lights, and it is interesting, but it is just some faint lights in the distance. If you like mysteries, you’ll enjoy it, if you’re looking for the most exciting activity, this might not meet your expectations. I would do it again.
While I was there, I did take a moment to photograph the night sky. I cannot remember ever seeing the milky way just by looking up. Although faint, and the core isnt’ visible here during the winter, it was definitely noticeable. This was my first time shooting the night sky. I toyed around with various exposure settings, but ultimately I found less than 10 seconds and an ISO around 3200 worked well. Any longer on the time and I had trails.
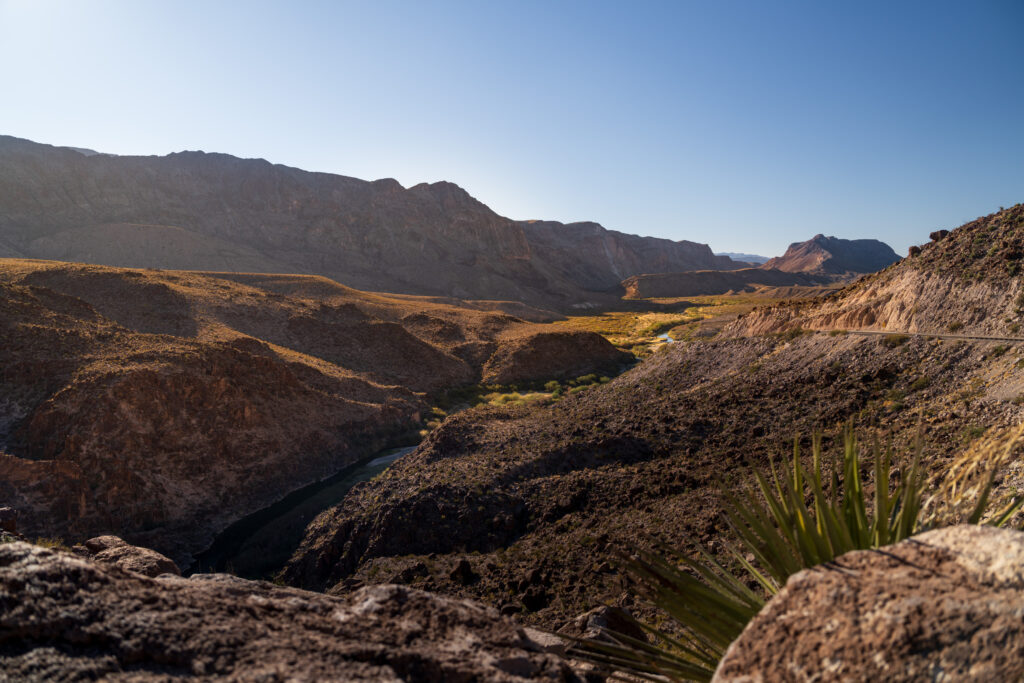
Big Bend National Park
The next day we were off before sunrise, but the light was already arriving. We drove east to Marathon, and then down to the park. Along the drive, sunrise happened, and I pulled over to take shots. The panorama is of the glass mountains.
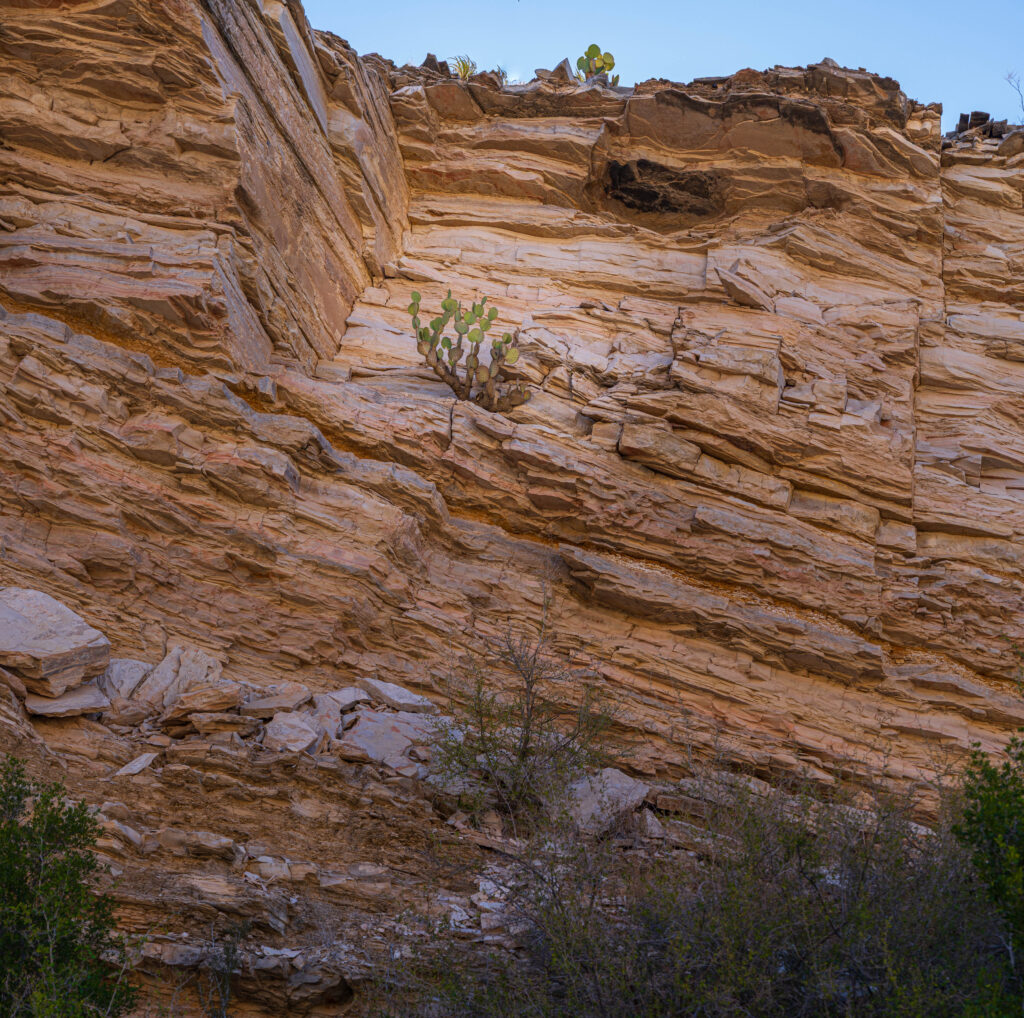
I really enjoyed the drive to the park, there was no line at the gate, and then we were in. You enter in a large desert valley. We stopped by the Panther Junction Visitor Center, and then headed to the Ernst Tinaja slot canyon. My friend had a capable 4×4, which was definitely needed for this drive. Although the slot canyon here wasn’t as exciting as those in Page, AZ, it was still very cool, and it has pools of a brilliant green liquid.
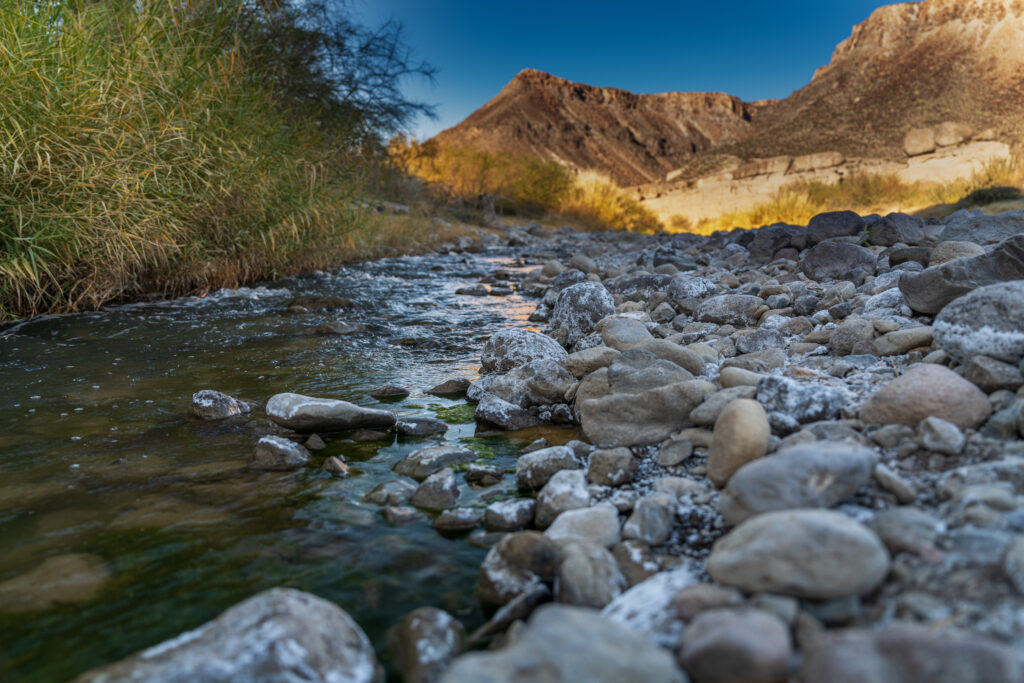
From there, we drove to the hot springs, but it was so packed that we gave up and headed to Rio Grande Village where we had lunch. This was really my first time seeing the Rio Grande. It is not an impressive river. It would be easy to cross if one felt so inclined.
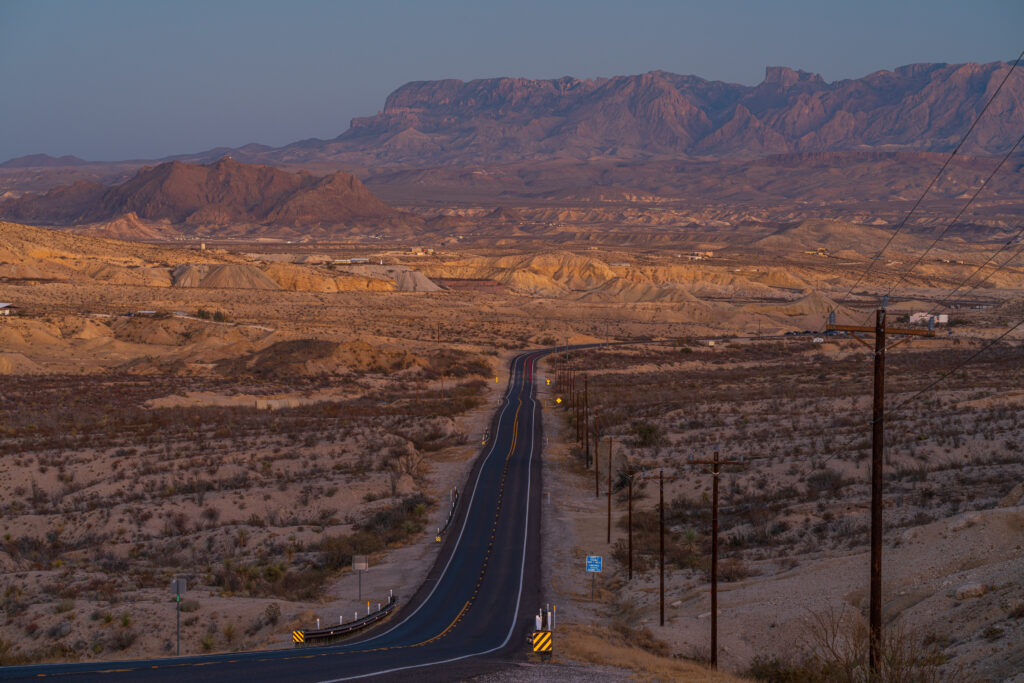
That was it for the day, and we headed back to Alpine. This time, I took the West exit and Highway 118 back to Alpine. This may be the best drive I’ve ever been on. The scenery changes many times, there are mountains, mesa’s, dunes, and open highway. It was stunning. Like a complete idiot, I didn’t stop to take pictures. I was a little tired, and thought I’ll just do it tomorrow. That didn’t happen and I really regret it.
The Next Day
I was traveling with a group of 5, but none of the other four are morning people, so I headed out early to get to the park by sunrise. I took 118, but it didn’t matter because it was so dark you couldn’t enjoy it.
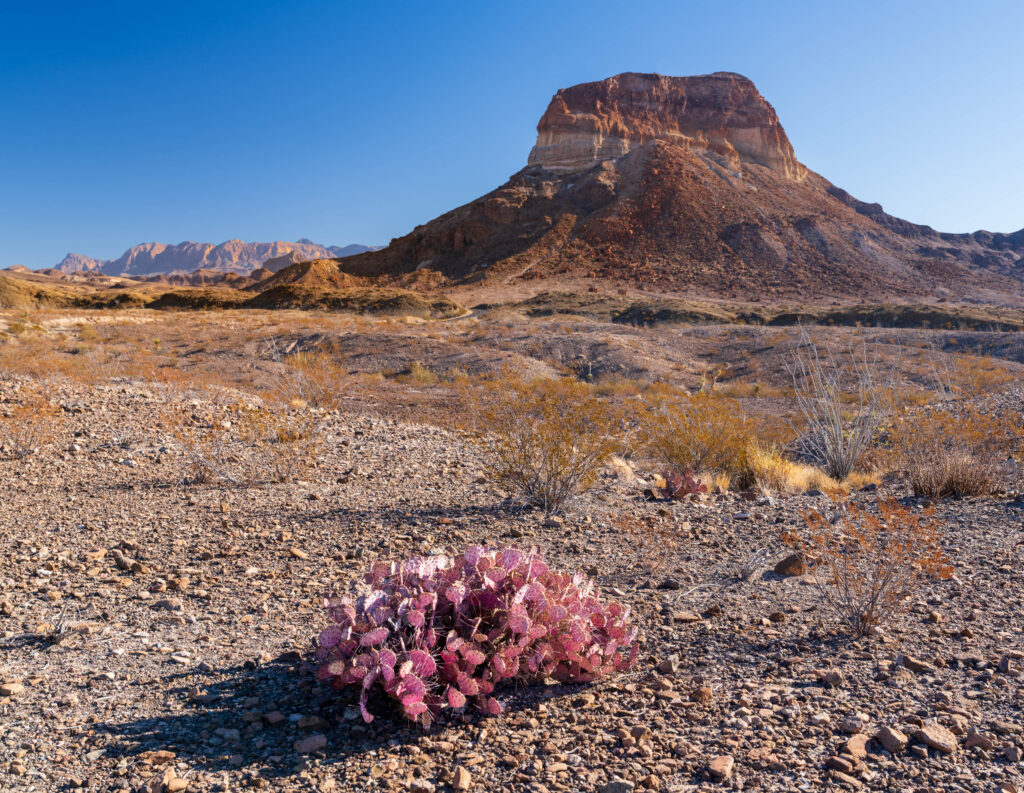
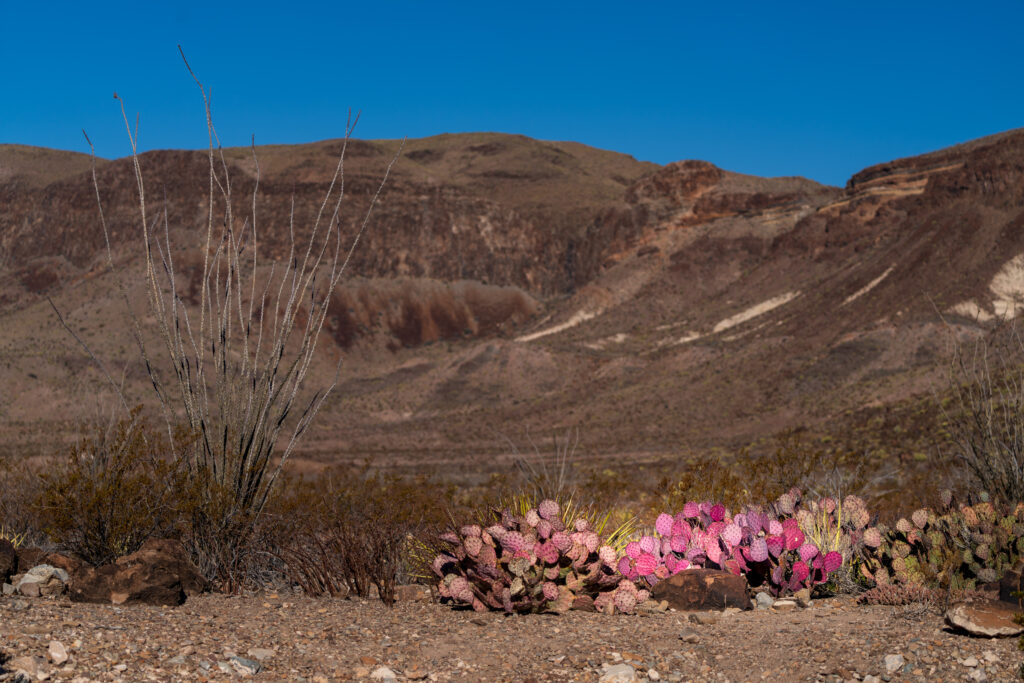
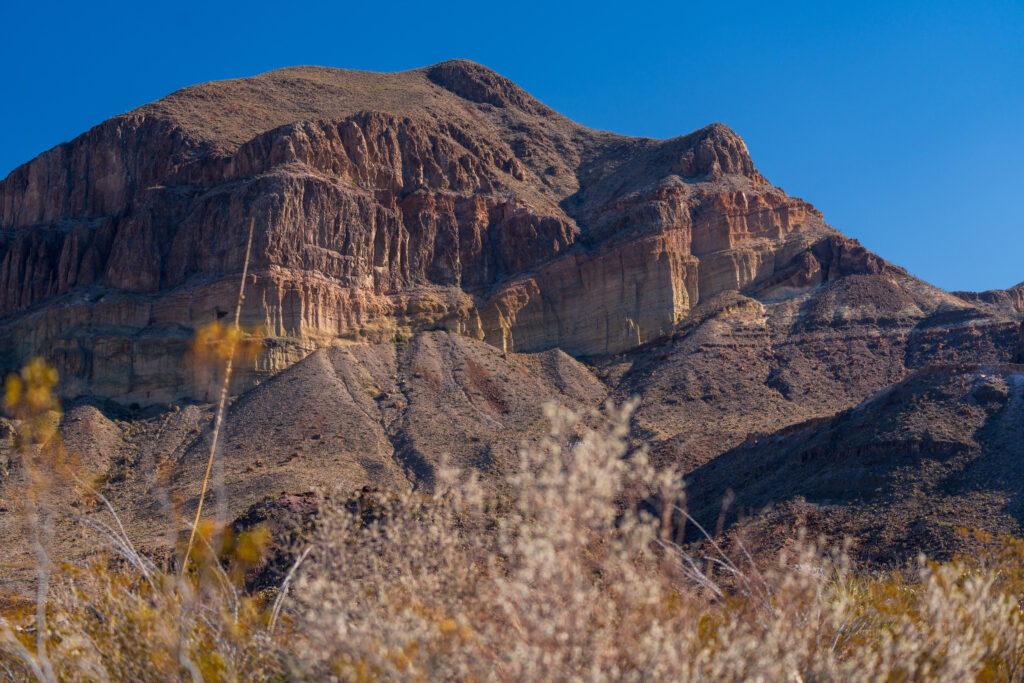
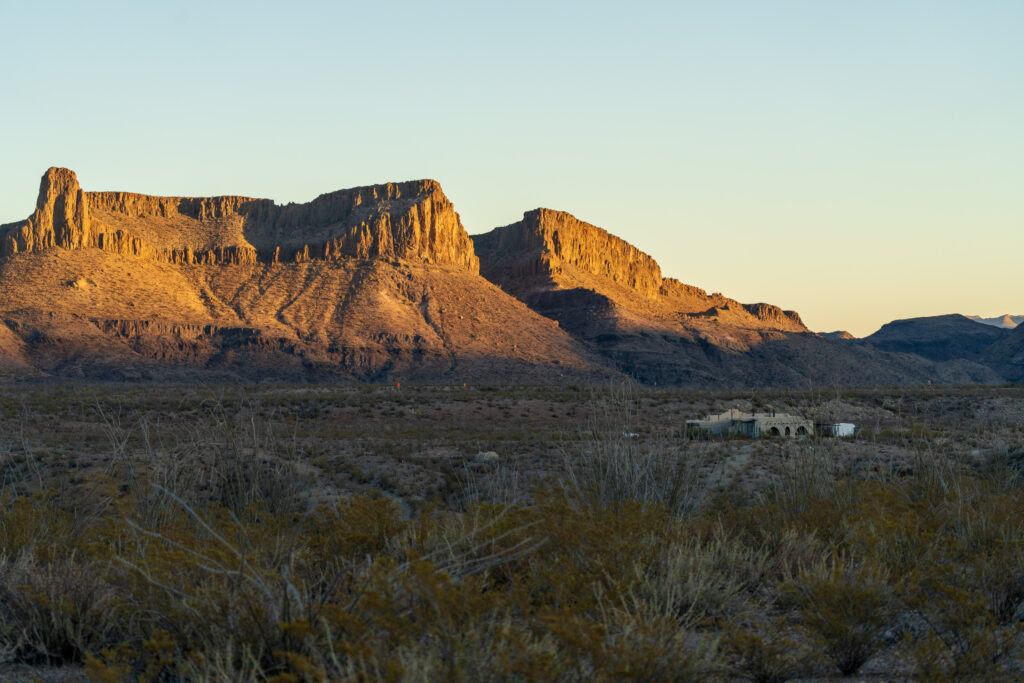
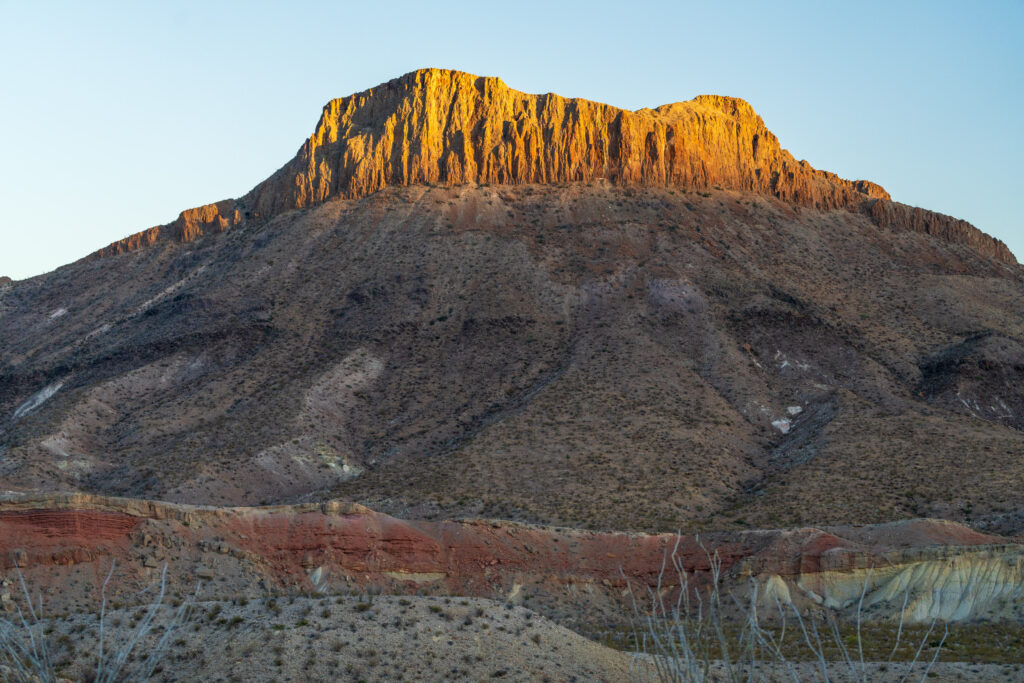
Once I made it to the park, the light was starting to arrive. I took the Ross Maxwell Scenic Drive. As the sun was starting to clip the mountain tops, I found a spot to pull over and I photographed the cacti and Burro Mesa. I then continued south to the Santa Elena Canyon. Morning is a great time to get there, after that, it gets very packed.
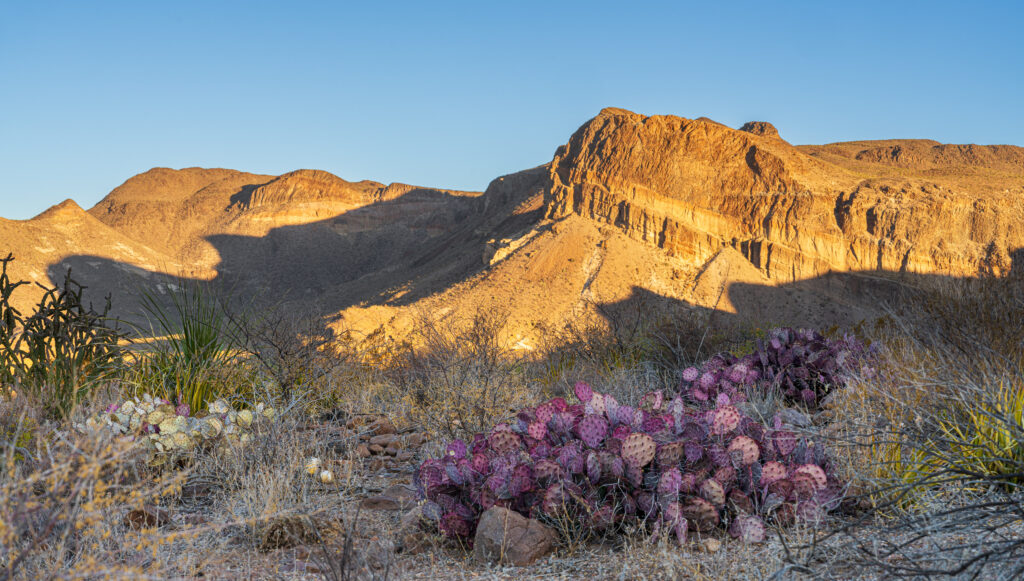
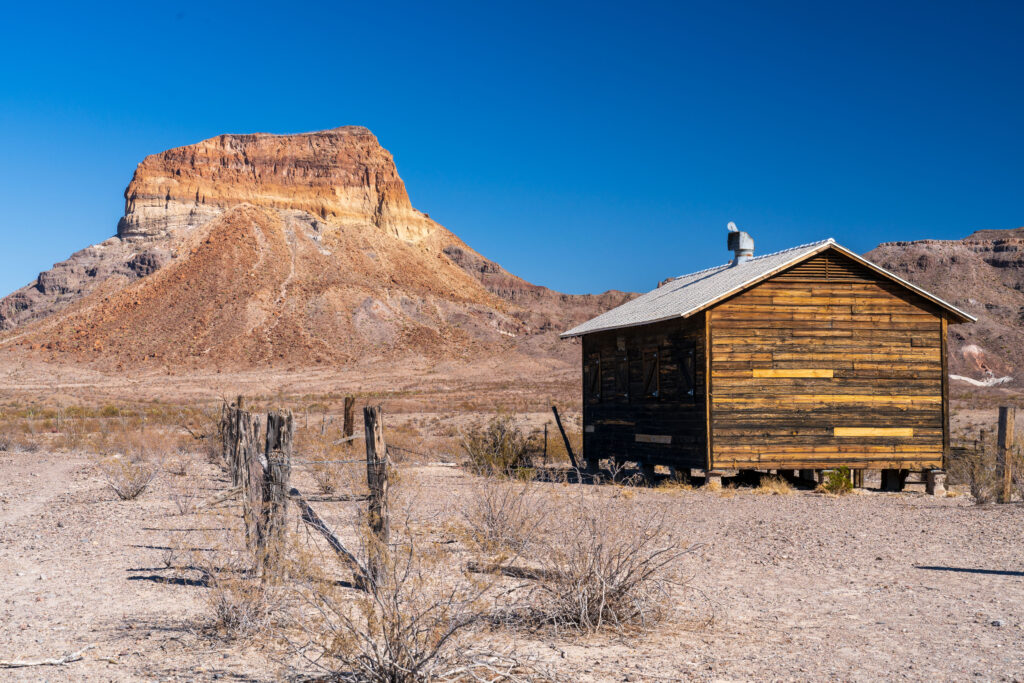
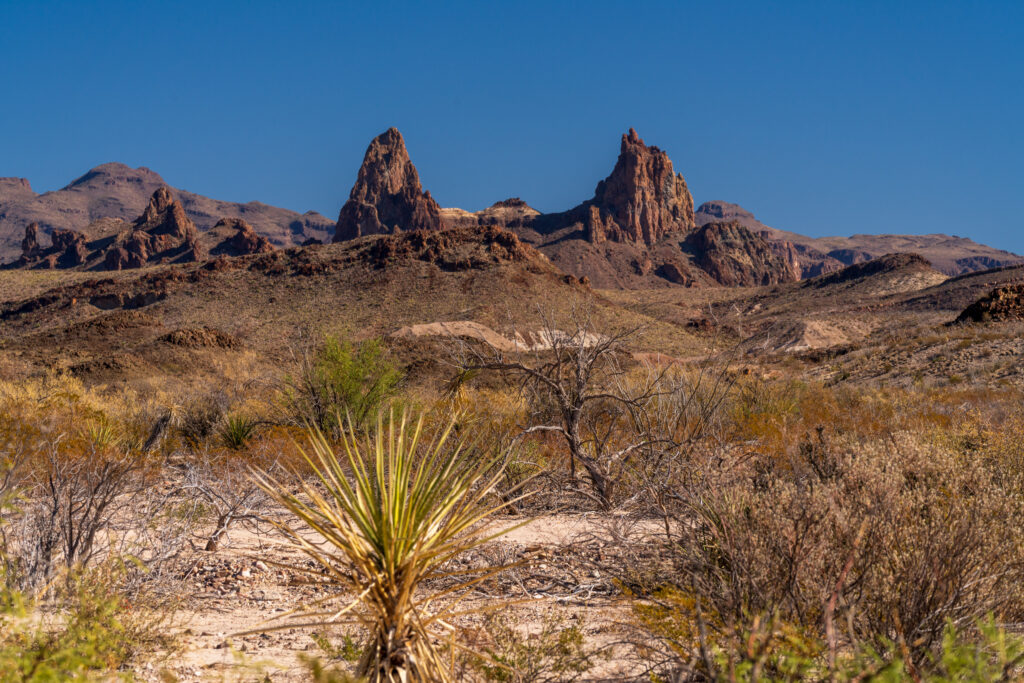
After getting my shots, I headed back north to meet my friends. This time I was good about pulling off to photograph features that caught my eye. This includes the Cerro Castellan mountain, pink cacti, Goat Mountain, the old Cerro Ranch and Mule Ears. We then headed west to the Big Bend Ranch State Park.
Big Bend Ranch State Park
This park is a real stunner. On the south side of the park, there’s really only the one main, paved road, Texas 170. This parallels the Rio Grande, for the most part, and includes incredible views of mountains, valleys, and the river. You can see here, the river is still not very impressive. If you’re in the area, I do highly recommend you stop by the park and enjoy the scenery, on the road, and on the trails. Having learned from the previous day’s mistake. I did stop along the way back to stop and take pictures. I loved the sunset on the land features. This includes the desert valley with Terlingua with the Chisos mountains in the background.
On the way back, I did take the famed Highway 118, but it was too dark to photograph, lesson learned, don’t plan on taking pictures later, there probably won’t be a later.
New Years Eve
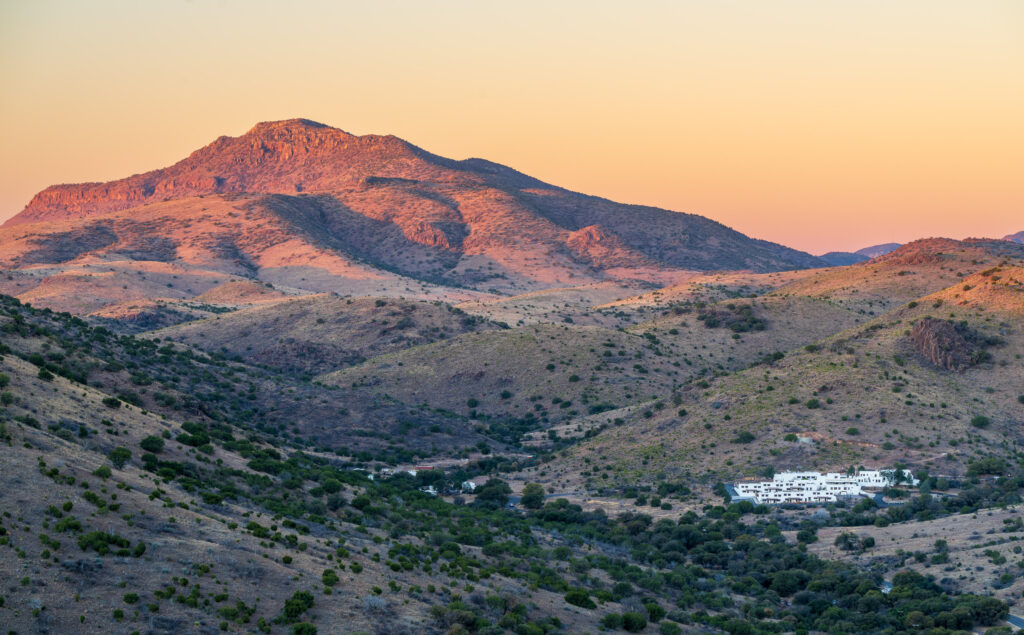
Our last full day on the trip started early, I headed out in the pitch black to go to the Davis Mountains State Park, which is just west of Ft. Davis, between the town and MacDonald Observatory. I drove to the highest point in the park, and waited for the light. As it emerged, I started to take inventory of the scenery. There was a nice view of the valley around Ft. Davis, but it wasn’t very picturesque, but on the opposite side there was a great view of Blue Mountain with the Indian Lodge nestled between the hills. I drove around the park for a bit after sunrise, and then headed back.
For Dinner, we went to Gage Hotel, where we had the best meal of the whole trip. We rang in the new Year in Marathon, and then returned to our place. The next day we drove back to El Paso, which did involve leaving an hour earlier since El Paso is in Mountain Time Zone.
All in all, it was a fantastic trip, I enjoyed the views, it is nothing like the landscapes in Houston, I hope to be back soon.
Sony A7R IV | 24-70 GM II | 24mm | ISO 100 | f11 | 1/200 secSony A7R IV | 100-400 GM | 143mm | ISO 100 | f5.6 | 1/500 secSony A7R IV | 100-400 GM | 306mm | ISO 100 | f5.6 | 1/500 secSony A7R IV | 24-70 GM II | 35mm | ISO 100 | f/11 | 1/8 secSony A7R IV | 24-70 GM II | 50mm | ISO 100 | f/11 | 30.0 secSony A7R IV | 24-70 GM II | 35mm | ISO 100 | f/11 | 1.0 secSony A7R IV | 24-70 GM II | 35mm | ISO 100 | f/2.8 | 1/800 sec
I recently enjoyed the fall in Georgia. I spent some time up in the mountains, and then a couple of days in Atlanta. This was a trip that I was invited to, so photography was not at the top of the list, but I did prepare a “hit-list” in case I had some time come available. I was very fortunate that my trip fell during the fall time. I think the mountains were just slightly passed prime, but Atlanta was not yet to prime fall color.
Mountains
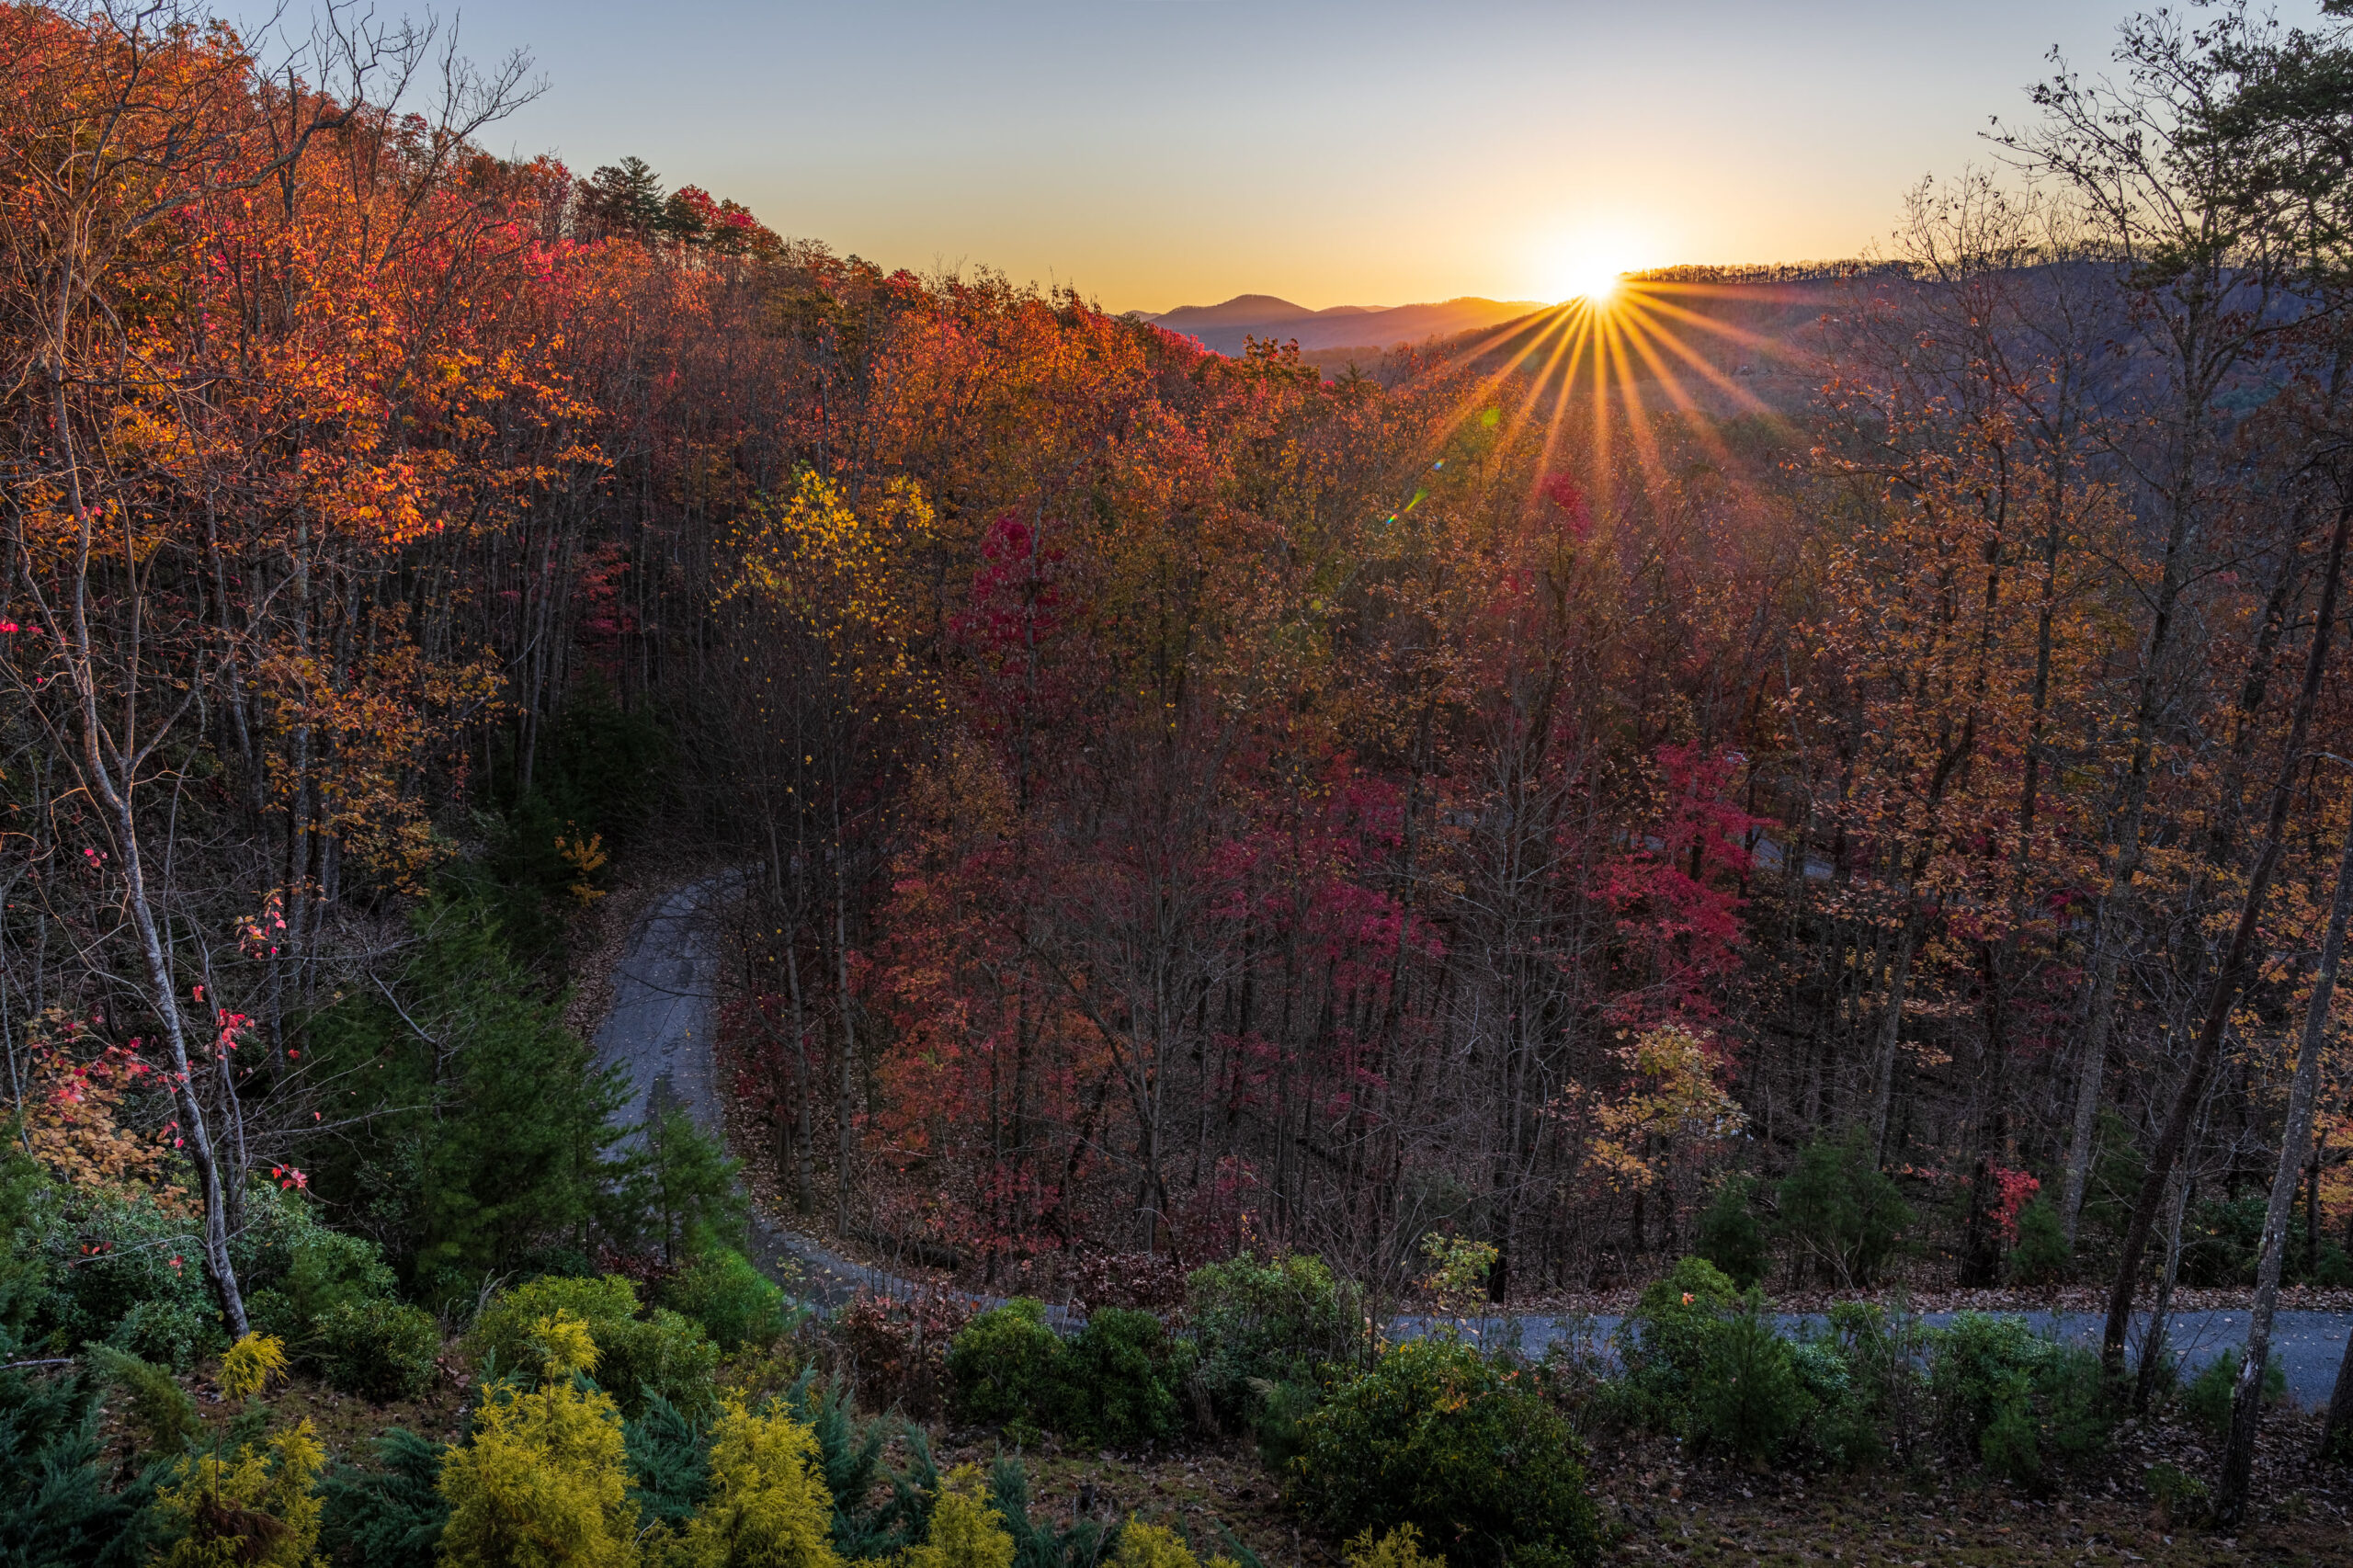
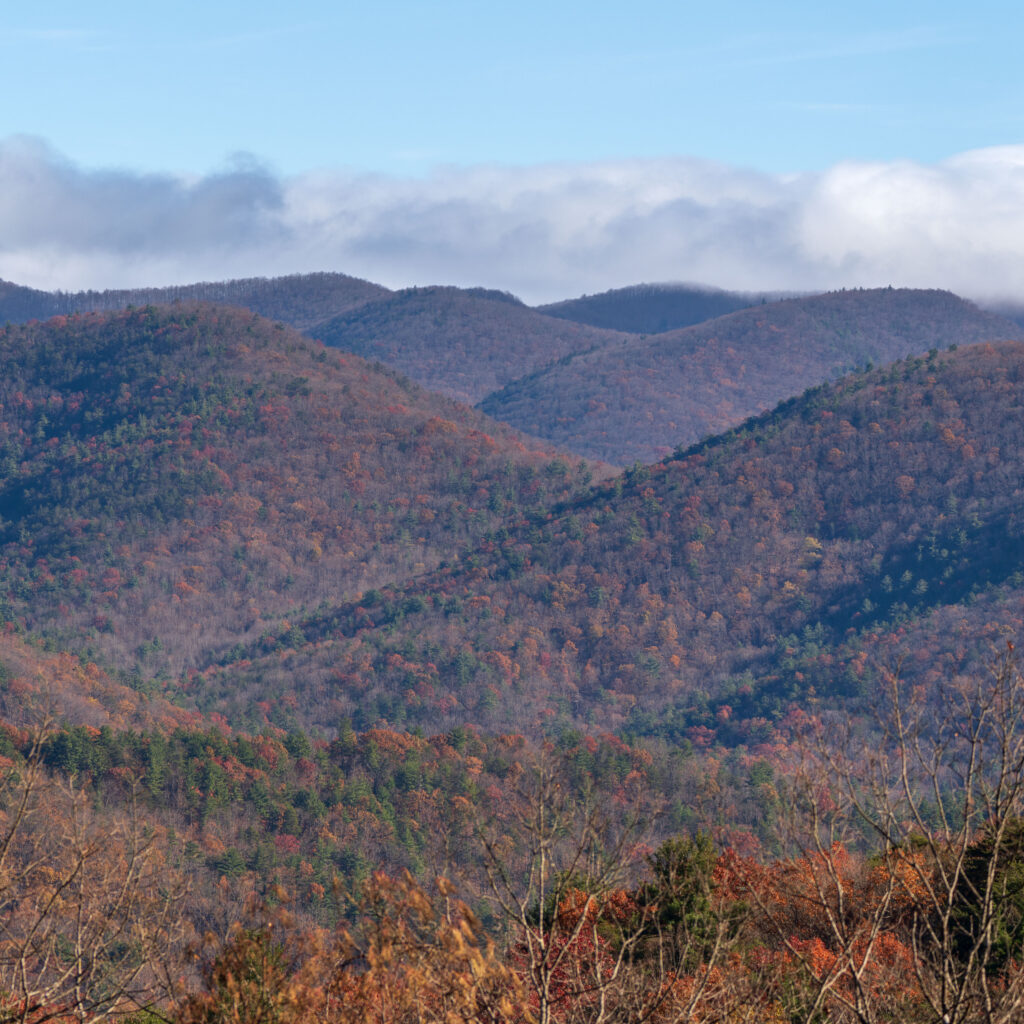
I was staying in Blue Ridge, GA. I was in a cabin on the side of a mountain. The sunrise photo was my view from the cabin. I haven’t done much with sun stars, but as the sun emerged, I cranked down on the aperture, and I really like what it adds to the image. This image is made from a bracketed HDR merge. It wasn’t super necessary, but I wanted to recover some of the shadows without destroying the highlights.
For the next photo, I was driving on Highway 60 south to Dahlonega, and stopped at overlook that provided a view of the layers of mountains. Upon arriving, I was thinking I was going to shoot wide, but I used the viewfinder app, and realized I needed to shoot tight. This is about 150mm. The light was quite harsh, and really I should have thrown on a CP, but I was able to warm it up in post, and get it closer to tolerable.
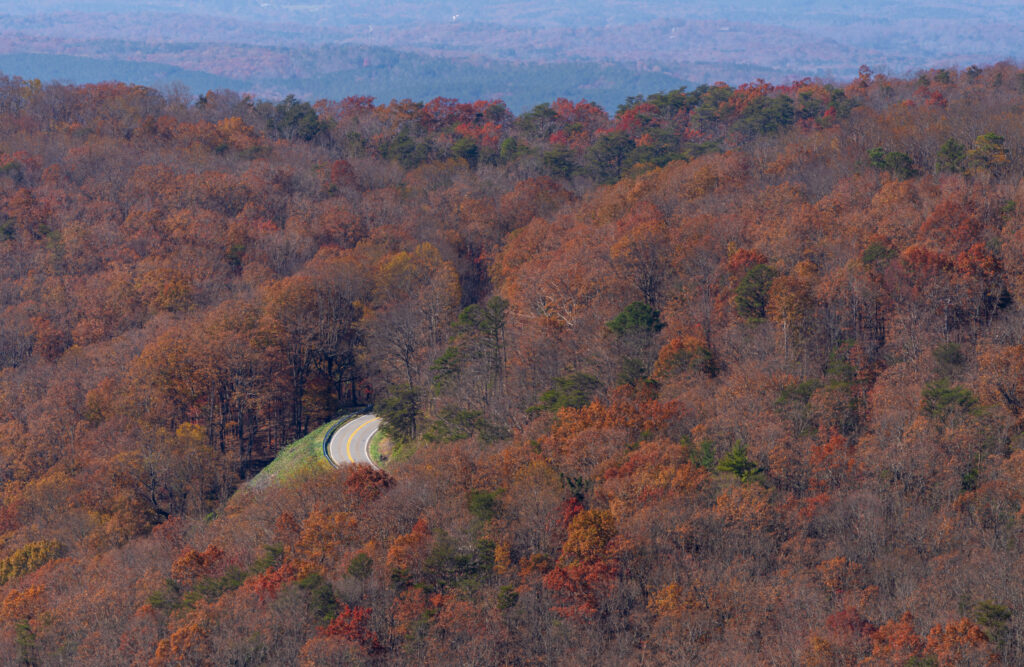
The last photo is a spot found when driving south on Highway 136 toward Jasper. There was an overlook that provided a nice view of the fall-colored trees with a piece of the highway exposed.
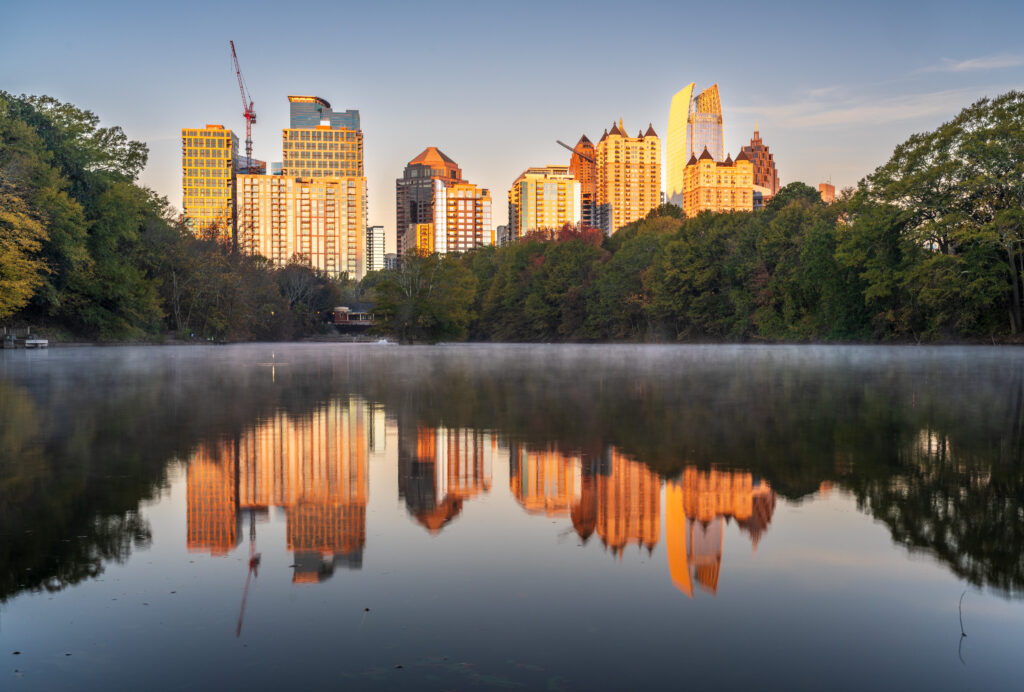
Atlanta
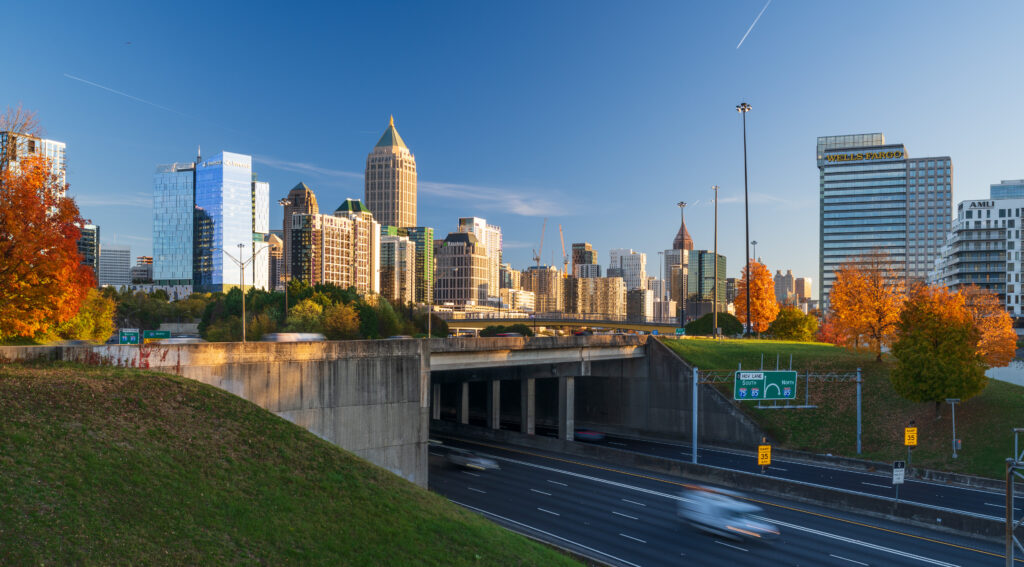
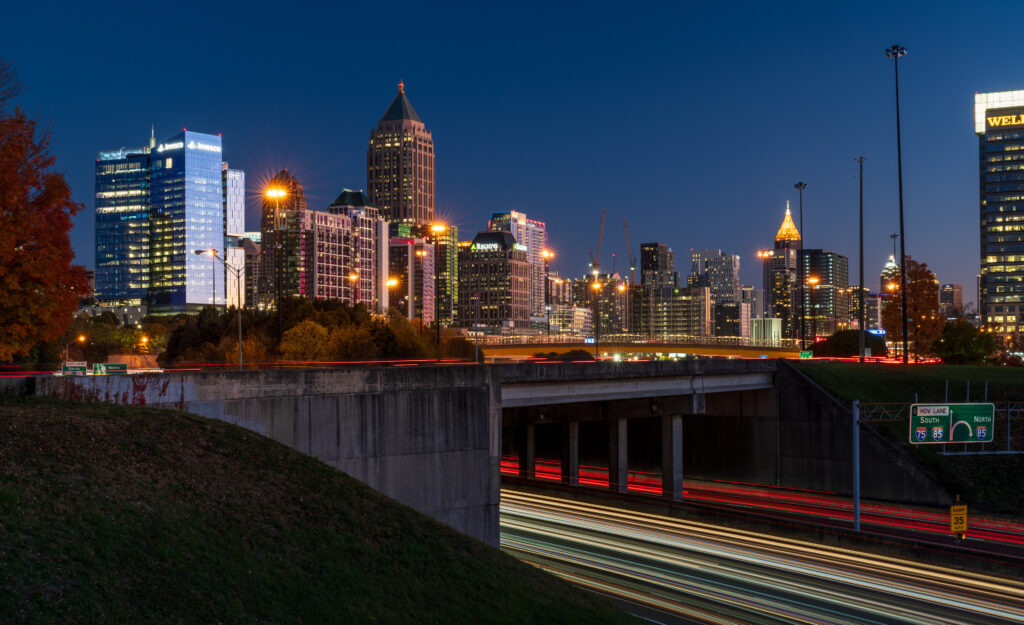
I got to Atlanta in the early afternoon and drove around to numerous of the spots that I had mapped, most were busts, but one just north of midtown looked like it could work. I checked into my hotel and returned later for the softer afternoon light. There was no convenient parking, so I found a public lot and hiked to my view point. This was not the perfect spot, I was too close to go with a longer focal length, but too far to feel immersed. It was still a pleasing scene, and I did appreciate the bright fall colored trees. The highway underneath also allowed for the light trails as the sun set.
The next morning, I woke up early and headed to Piedmont Park for the classic midtown view. There was a bit of bird activity, but as the sun rose, the fog emerged over the lake. I only wish there was a bit more fall color.
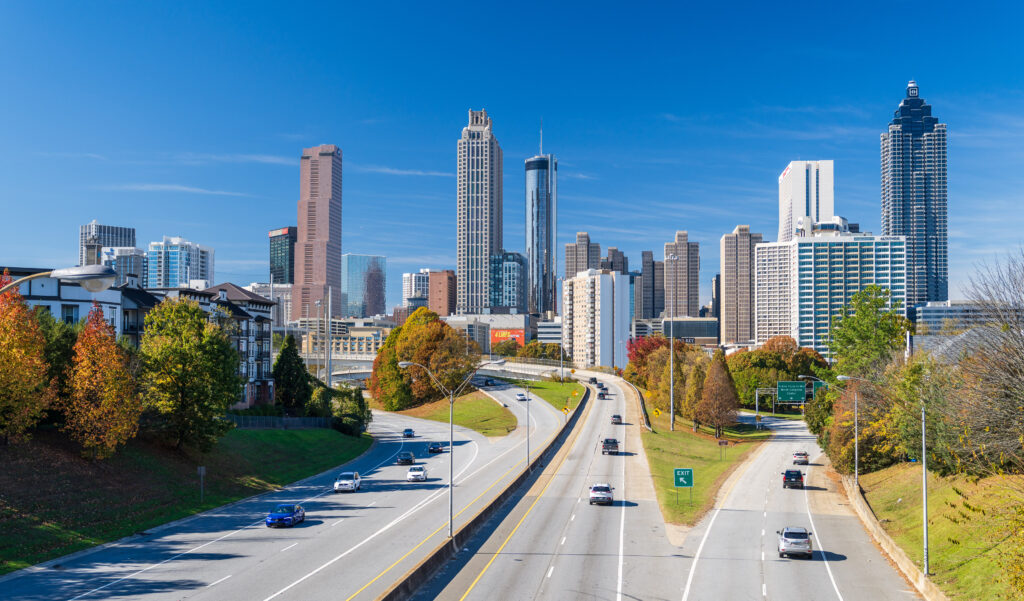
On the way to the airport, I did a stop at the Jackson Street Bridge. It is a nice perspective of the city. I did CP up to get the color back in the sky. I’d like to have gone during blue hour to get the city lights. This spot was much busier, numerous others were there to take selfies.
It was a good time, and I came away with some pictures that I liked. Now I’m gearing up for a trip to West Texas at the end of the year.
For a brief moment, the sun, the moon, and I were in alignment. I was there, prepared, and these are my photos of the event.
Sony Alpha 7R IV | Sony 100-400mm GM | 2x Teleconverter | 800mm | ISO 100 | f/16 | 1/640 secSony Alpha 7R IV | Sony 100-400mm GM | 2x Teleconverter | 800mm | ISO 100 | f/16 | 1/640 secSony Alpha 7R IV | Sony 100-400mm GM | 2x Teleconverter | 800mm | ISO 100 | f/11 | 1/640 secSony Alpha 7R IV | Sony 100-400mm GM | 2x Teleconverter | 800mm | ISO 100 | f/11 | 1/25 secSony Alpha 7R IV | Sony 100-400mm GM | 2x Teleconverter | 800mm | ISO 100 | f/11 | 1/100 secSony Alpha 7R IV | Sony 100-400mm GM | 2x Teleconverter | 800mm | ISO 2000 | f/11 | 1/25 secSony Alpha 7R IV | Sony 100-400mm GM | 2x Teleconverter | 800mm | ISO 1000 | f/11 | 1/640 sec
Preparing for the Eclipse
The First Attempt
Preparing for this event started back in October of 2023. I was in Houston, and learned that an eclipse would be passing over south Texas in just a few day’s time. I was really kicking myself for not being prepared and being in the path.
I went to B&H to see what filters they had for eclipse photography, and I found a bunch of 16 stop neutral density filters that blocked ultraviolet and infrared radiation. I also learned that the PolarPro Summit filters that I use met these requirements. At the time, I had a 10 stop and a 6 stop filter, so I just planned on stacking them.
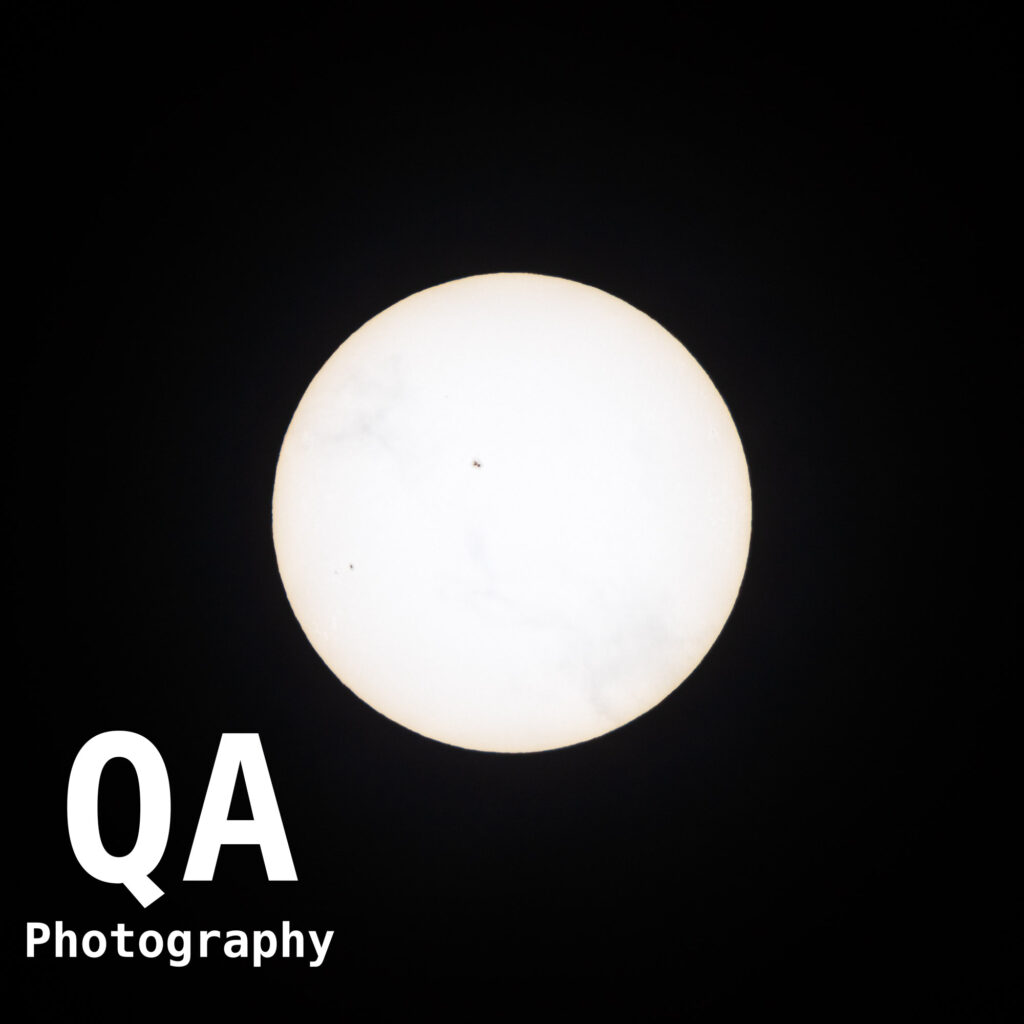
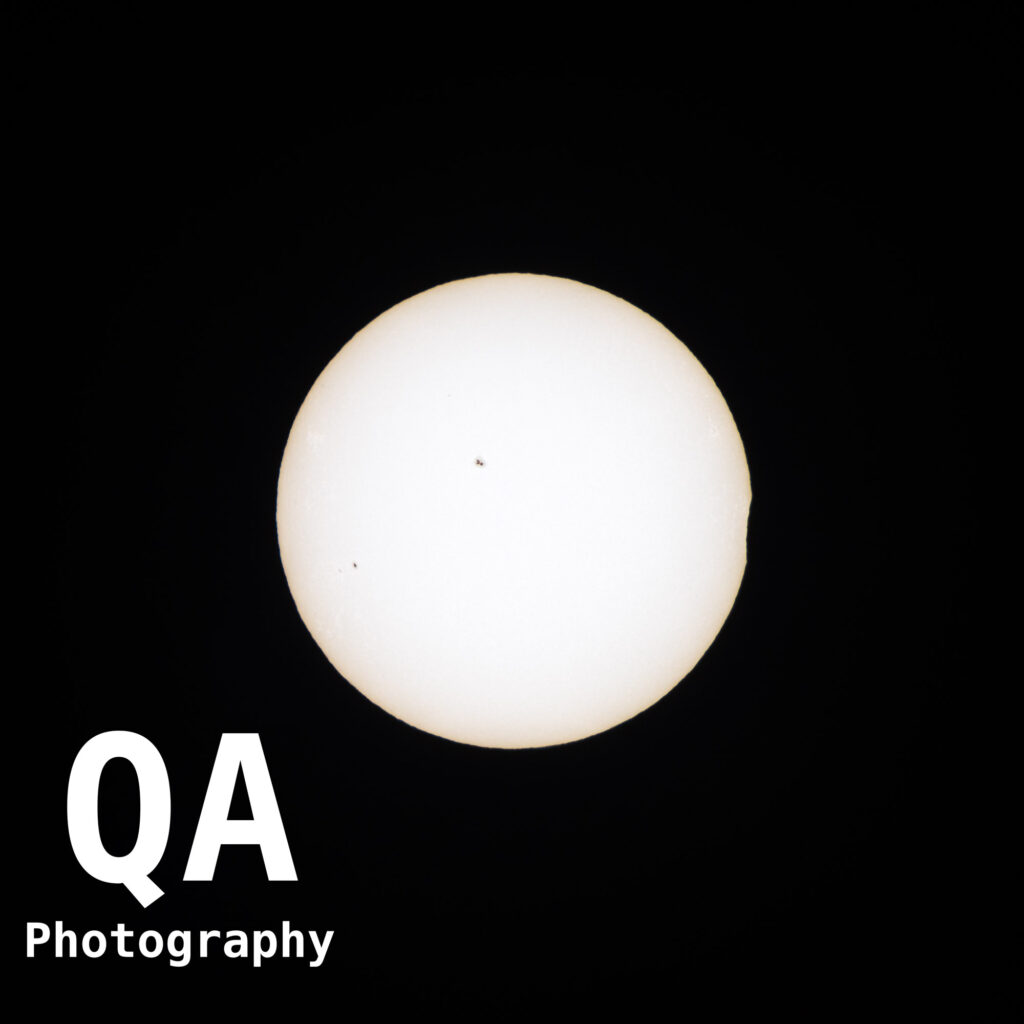
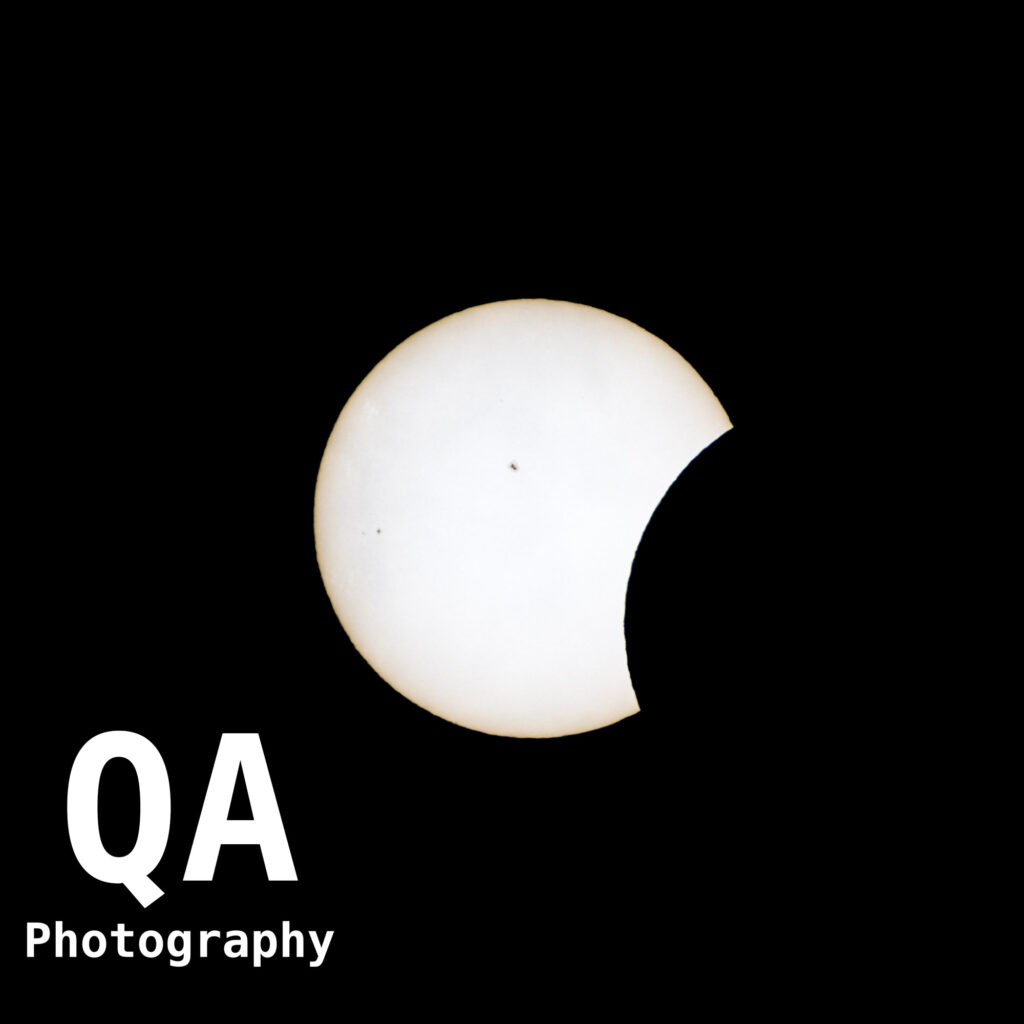
On the day of, I found a parking garage and setup my tripod. I enabled bracketing, manually focused, and started shooting. In Houston, we only saw about 85% coverage of the sun. I did not have eclipse glasses, and it was always too bright to look at. It does dim, but it’s a very gradual process. However, at peak coverage (for Houston) it was then obvious how much dimmer it was than normal.
This was good practice because the changing conditions did require changing the exposure. I really leaned on the histogram to gauge this, and it was reliable. Throughout the event, I did over and under expose just to see how those would turn out. Over exposed was terrible as the entire sun was clipping, but under exposed did appear to yield more detail. However, this was detail that was recoverable with some minor edits with the exposing to protect the highlights.
Preparing for April 2024
Fortunately, after the 2023 eclipse, I was pumped to learn of the total eclipse coming close by just 6 months away. I started looking into AirBNB’s in the area and quickly found that they were charging over $1000/night. I switched to hotels, and found one reasonably priced just east of Austin, so I booked it. It was nice to have that out of the way because a few weeks later a friend was doing the same search and found no results.
Next was gear. One effect I did have in my images from the first attempt was some ghosting. I did buy a 15 stop ND filter to eliminate that. I also purchased the 2x teleconverter. I know many believe teleconverters are bad because they degrade the image quality too much. I wanted to try it out, anyways. I took many test shots of many different subjects in different lighting conditions and pixel-peeped like there was no tomorrow. If I’m being honest, I don’t have the best trained eyes, and I don’t have experience with many other systems to compare against, but I was happy with the results. I found images to be sharp, and I liked the additional reach. The smaller apertures didn’t bother me, either. I do believe 800mm was a great focal length for shooting the eclipse. I also purchased some typical cardboard eclipse glasses. Coolness factor aside, being able to look up was useful.
A few days before the eclipse, we did our grocery shopping so we could pack a cooler and be self sufficient on the day of.
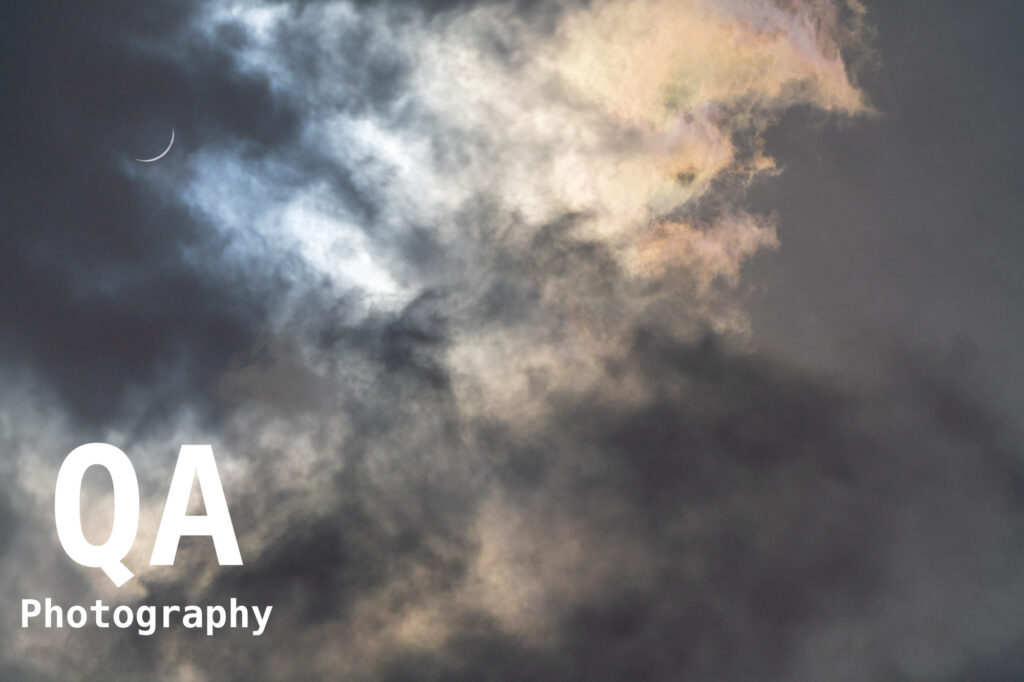
The Eclipse
The Weather
As the calendar approached April, my attention turned to the weather. Many websites posted weather forecasts, but this wasn’t based on any real information. One thing I love about living in Houston, is having Space City Weather. That team does a fantastic job of interpreting the data and providing real information. They’re honest when confidence is low, and they also call out bogus predictions when the data isn’t there.
That rant about weather predictions was due to the fear and frustrations weeks prior to our trip. Fact is, the closer we got, the better the forecasts got, the worse the news got. Of learning of the grim forecast, I immediately became an armchair meteorologist.
The prospects weren’t good.
Since I’m unable to affect the weather, I started searching and marking possible viewing locations like city and county parks. My goal was to have a plethora of options so on the day of, I could see where the best weather was and head to that general area.
The Day Of
Monday morning started at 5:00 AM. We had a 2 hour drive ahead of us, and we weren’t sure what kind of traffic we would encounter. We’d also be competing with typical Austin commuter traffic, too. My girlfriend was not appreciative of the early start.
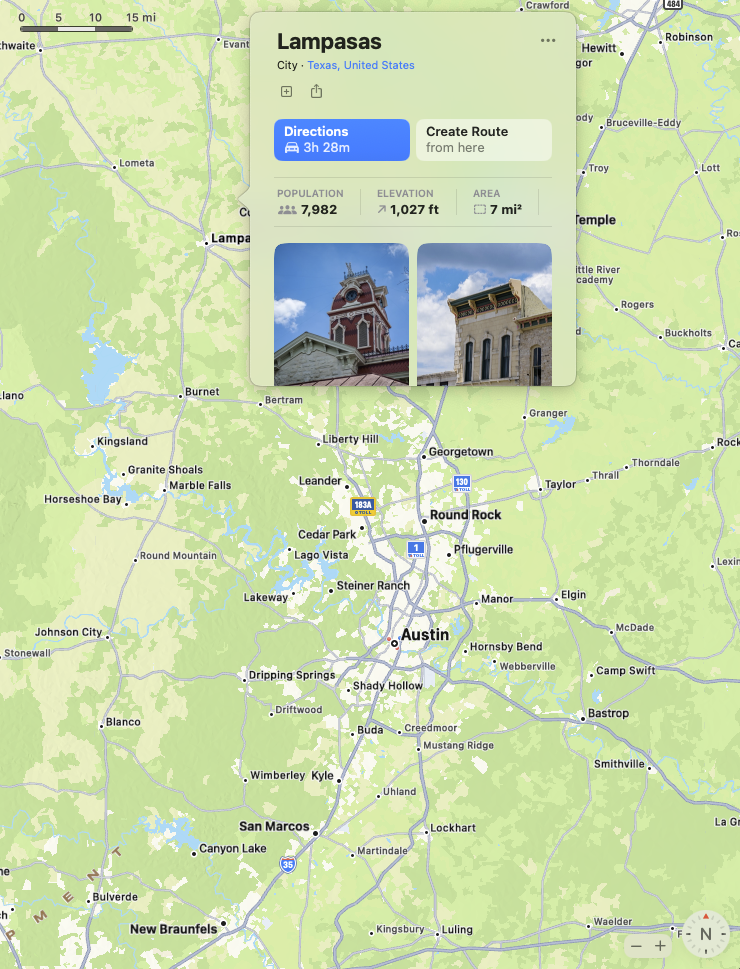
Based on weather, it looks like we’d have a shot in Lampasas, which had a nice downtown park area, so that’s where we headed.
Traffic was thick, but not bad, and once we got to Austin and headed Northwest, things really cleared out. The more we drove, the light started to come out, we got further into Hill Country and it was a quite pleasant drive.
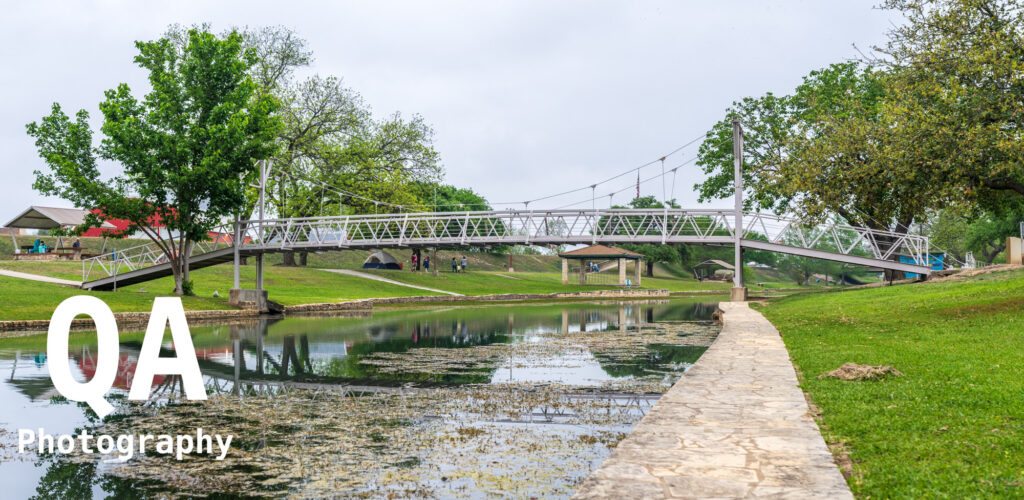
We made it to Lampasas with no drama. The park was quite empty, but people had been camping there overnight and we were far from the first on the scene. We were able to secure a picnic table and setup for a long day. I walked around the park. Here’s a shot of the creek and foot bridge.
Sony Alpha 7R IV | Sony 16-35mm GM II | 34mm | ISO 100 | f/5.6 | 1/25 sec
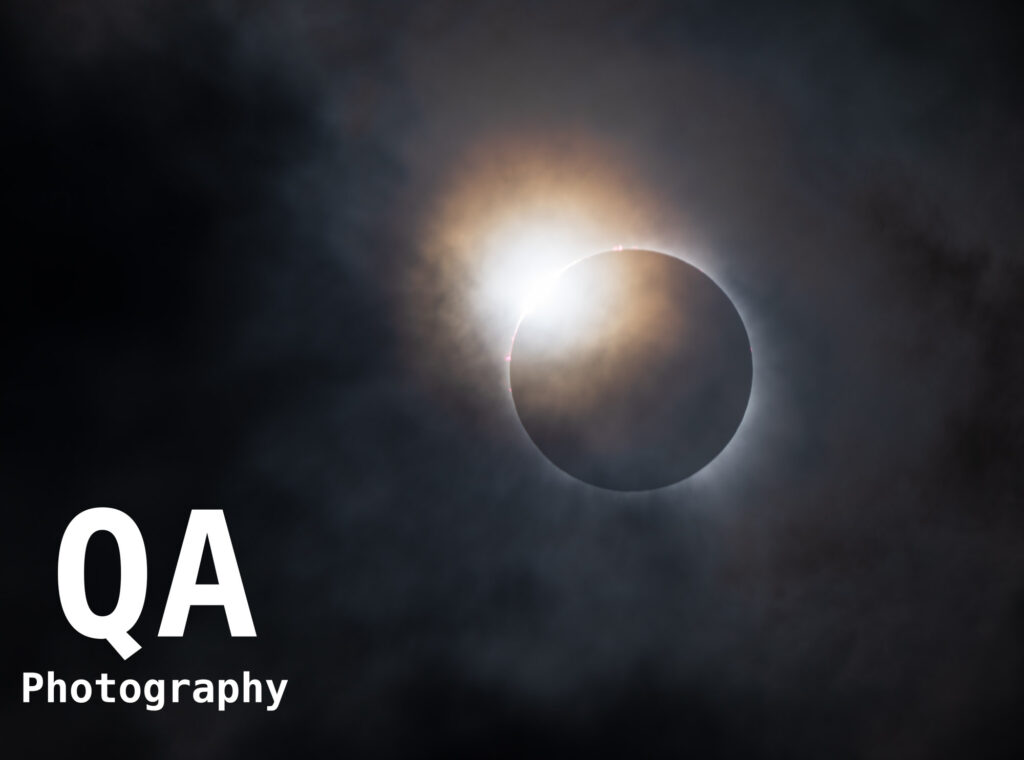
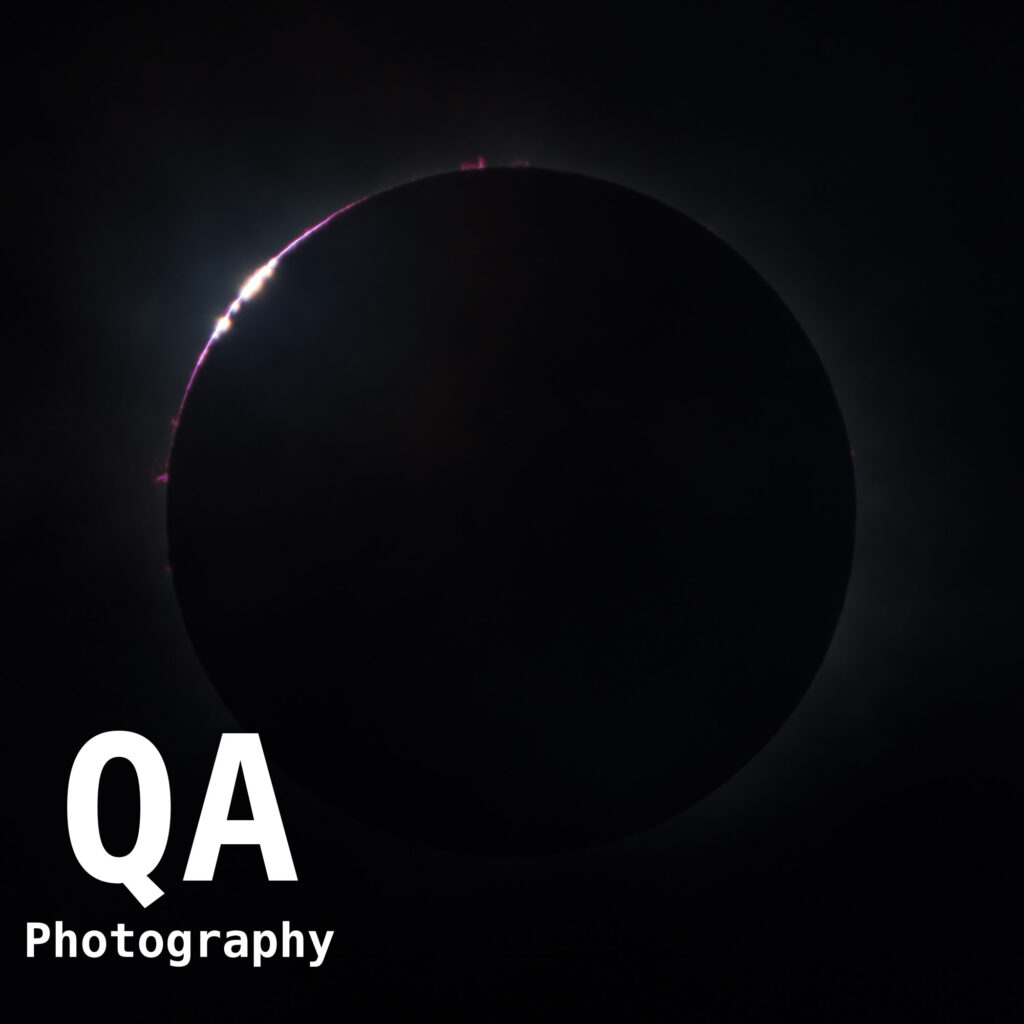
Then it was just waiting for the eclipse, which was to start in early afternoon. As time got closer, I setup my equipment, did some test shots, confirmed focus and exposure. Then with about 10 minutes to go, it was all eyes on the sun.
By this time the park was packed. There was no more parking, and people were everywhere. We were situated next to a family from Alaska.
It was an incredible day and a brilliant experience. I do recommend it if you’ve not had the chance before. Traffic was terrible on the way out, and we waited until the moon had passed completely by. Fortunately, I found back roads and wasn’t having to do deal with the stress of it all.
When we got back to the hotel, I did a quick first pass on my photos to share with friends and family.
Weeks later I finally got around to a more thorough culling process and creating my composite.
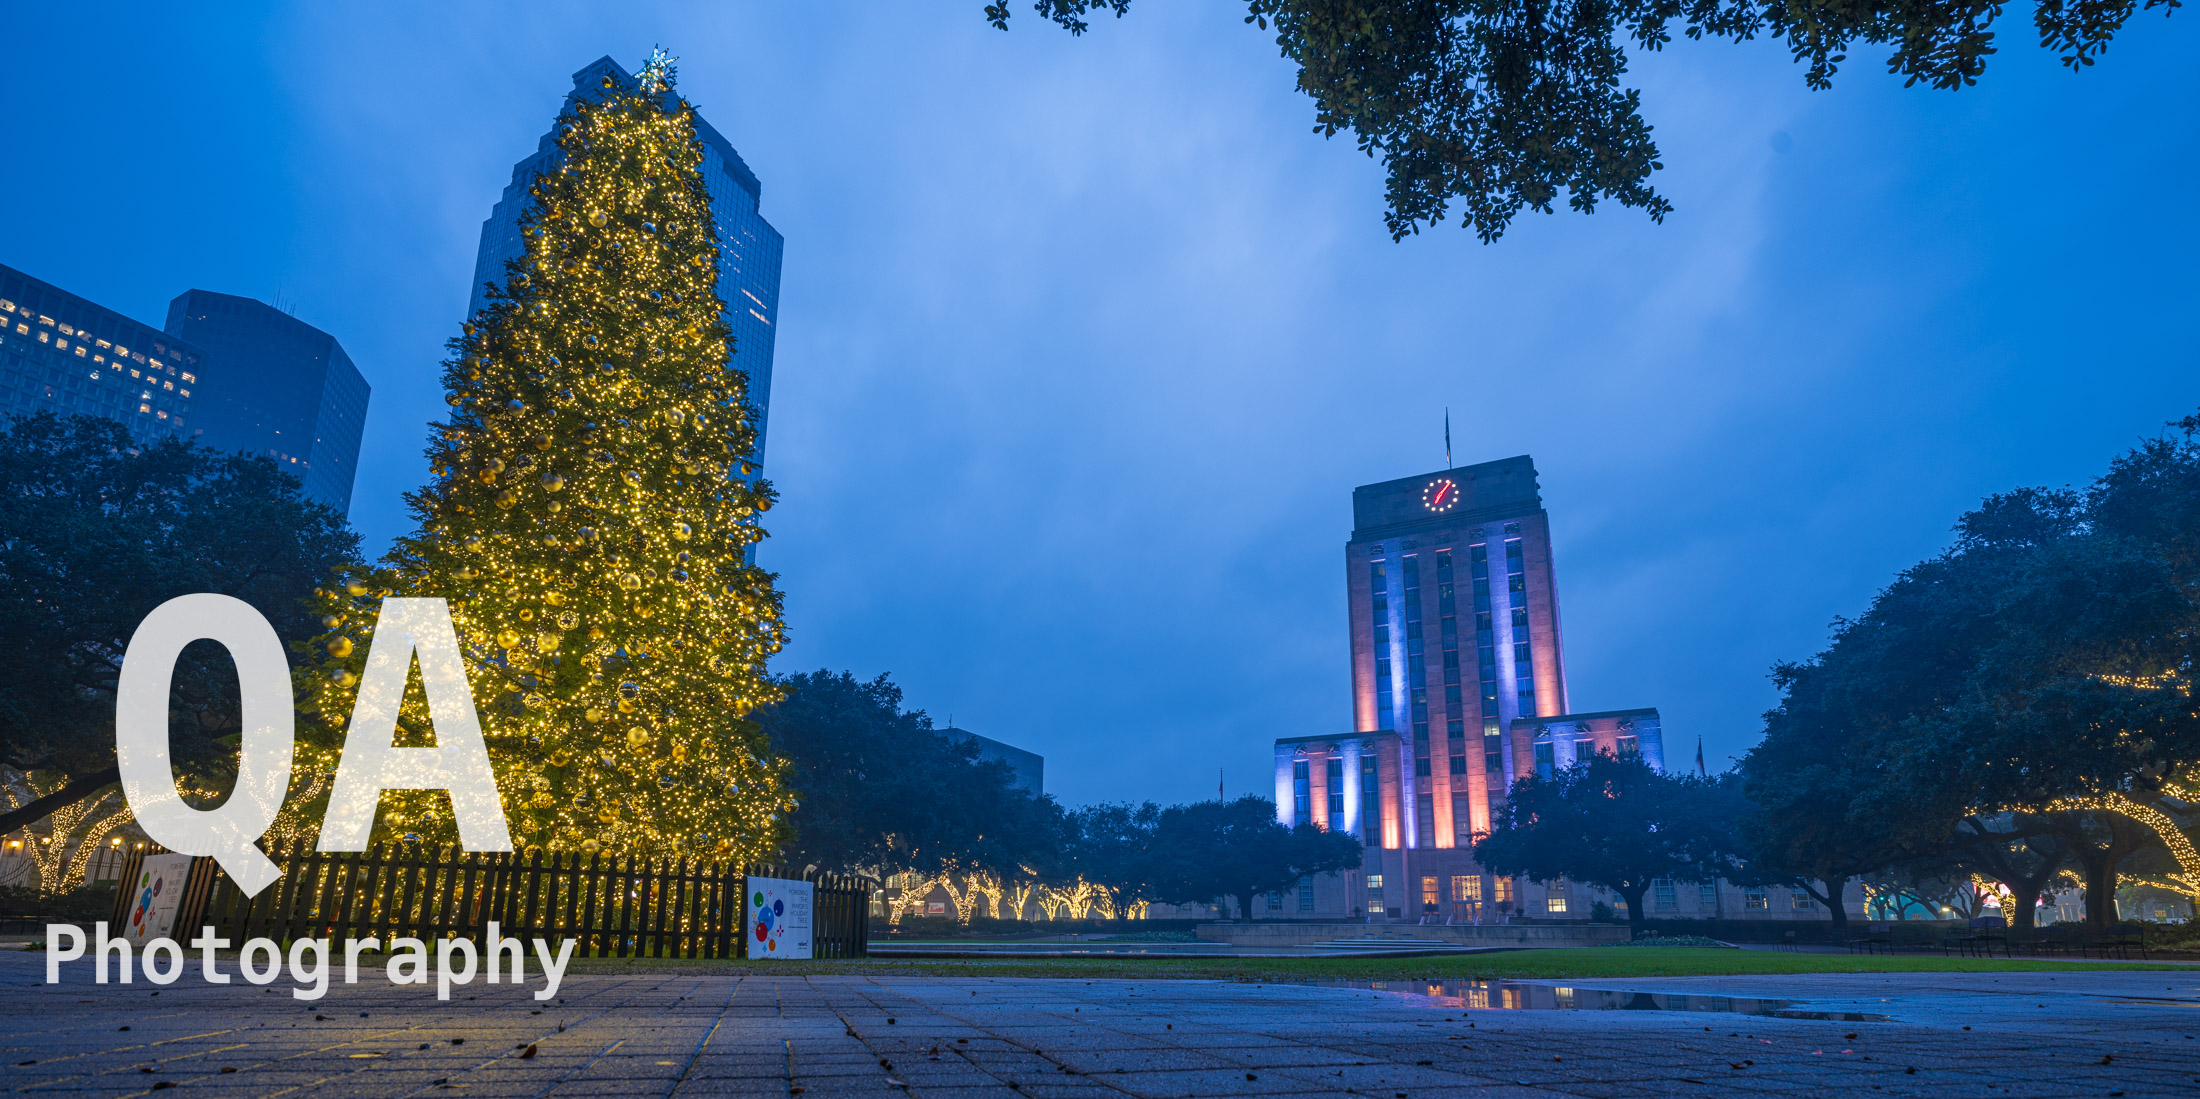
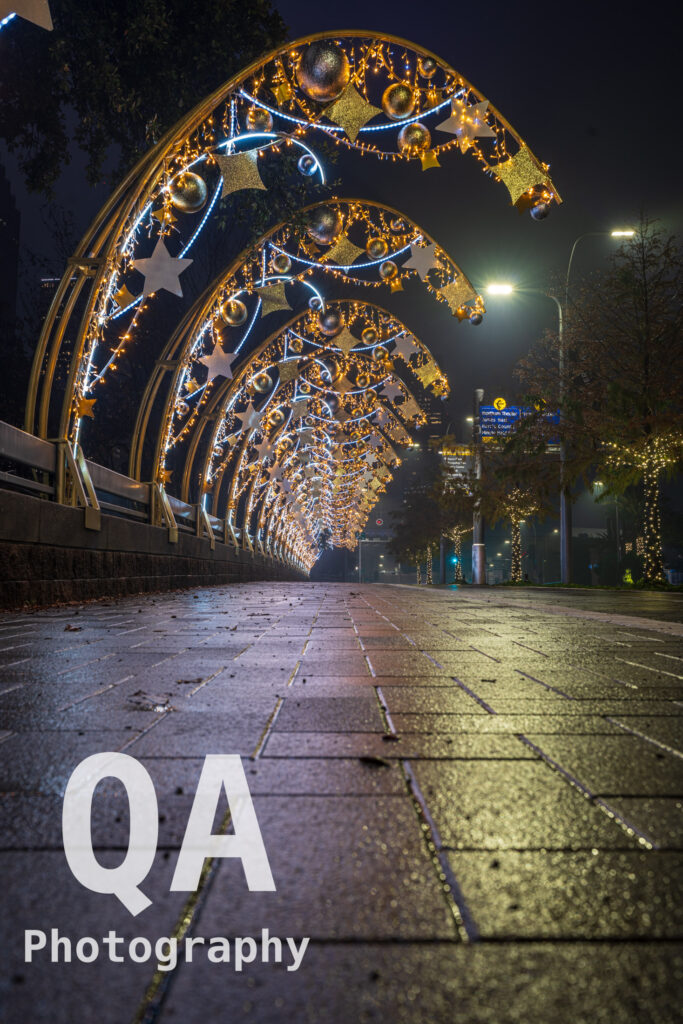
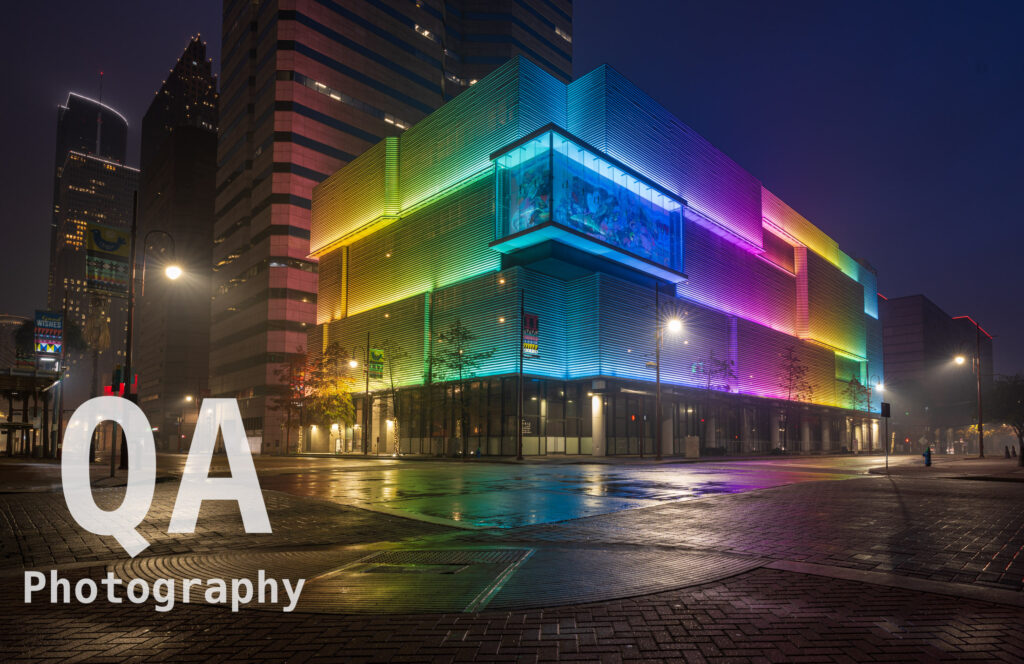
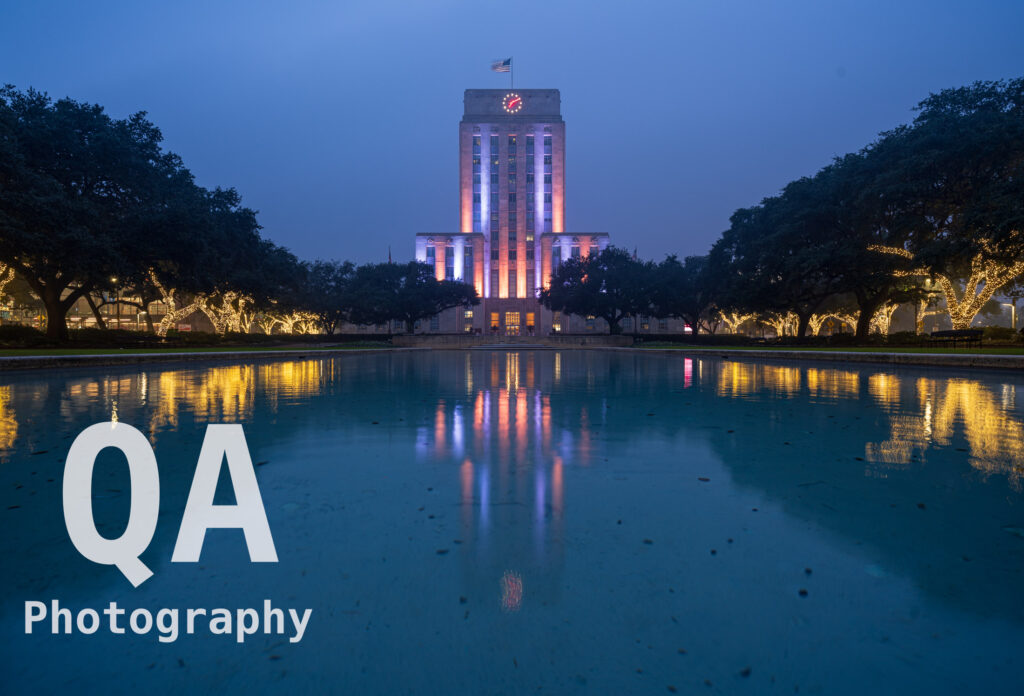
After a busy holiday season, I finally had a weekend to myself, and so decided to get out and do some photo taking. I opted to go downtown, and they still had the Christmas decorations up. Although I don’t typically obsess over Christmas decorations, I did appreciate how it dressed up the typical scenes. I did a little walk from Buffalo Bayou east into downtown, and then south to City Hall and back.
Sony Alpha 7R IV | Sony 16-35mm GM II | 16mm | ISO 100 | f/5.6 | 8.0 secSony Alpha 7R IV | Sony 16-35mm GM II | 30mm | ISO 100 | f/8 | 0.8 secSony Alpha 7R IV | Sony 16-35mm GM II | 16mm | ISO 100 | f/8 | 1.6 secSony Alpha 7R IV | Sony 16-35mm GM II | 16mm | ISO 100 | f/8 | 1.6 secSony Alpha 7R IV | Sony 16-35mm GM II | 16mm | ISO 100 | f/8 | 1.6 sec